Discover the World’s Finest Thermomechanical Analyzer
The TMA 450 delivers Superior Performance, Unmatched Sensitivity & Maximum Versatility.
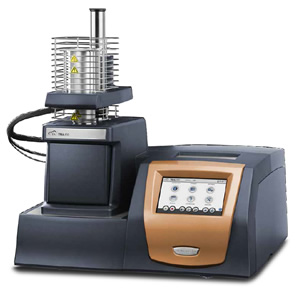
DISCOVER the WORLD’S FINEST THERMOMECHANICAL ANALYZER
TA Instruments invites you to experience the finest in Thermomechanical Analyzers, the Discovery TMA 450. Discover the advanced engineering and attention to detail that provides enhancements in every aspect of performance and a new level of user experience. Featuring advanced testing capabilities and the widest range of fixtures, the Discovery TMA 450 is sure to meet and exceed your expectations. It’s never been easier to get great TMA data!
Features & Benefits
- Non-contact, friction-free motor delivers forces from 0.001 N to 2 N enabling measurements on the widest range of samples from soft compressible elastomers to stiff composite materials.
- Wide-range, high-resolution measurement transducer accommodates sample lengths up to 26 mm, a measuring range of ±2.5 mm with resolution as low as 15 nm for an accurate dimensional change measurement.
- Advanced testing modes of Modulated TMA (MTMATM), Dynamic TMA, Creep and Stress Relaxation extend capabilities and empower users with even more valuable information about the mechanical behavior of materials.
- Convenient Mechanical Cooling Accessory (MCA 70) provides controlled cooling to -70 °C without the cost or hassle of liquid nitrogen.
- Powerful TRIOS software delivers exceptional user experience and ease-of-use in a combined package for instrument control, data analysis, and reporting, reducing training times and raising productivity to new levels.
- New, innovative, “app-style” touch screen puts instrument functionality simply One-Touch-Away™, enhancing usability and making it easier than ever to get great data.
- Every instrument comes with a commitment to quality backed by the industry’s ONLY five-year furnace warranty for peace of mind.
With the ever-increasing demands for higher performing materials to meet the needs of challenging applications, understanding how a material reacts to its environment is more important than ever. Meeting and exceeding industry standards* for testing, the Discovery TMA 450 provides information about the material’s coefficient of linear thermal expansion (CTE), shrinkage, softening, glass transition temperatures, and much more.
The advanced options can be used to obtain viscoelastic properties such as the material’s stiffness (modulus), damping properties (tan delta), creep, and stress relaxation. The TMA 450 is particularly useful for measuring these material properties locally, especially in manufactured components or assemblies where compatibility of materials is paramount.
* ASTM E831, E1545, D696, D3386 and ISO 11359: Parts1-3
Specifications
| Discovery TMA 450EM | Discovery TMA 450 | |
| Temperature Range (max) | -150 to 1000 °C | -150 to 1000 °C |
| Temperature Precision | ±1°C | ±1°C |
| Heating Rate | 0.01 to 150 °C/min | 0.01 to 150 °C/min |
| Furnace Cool Down Time (air cooling) | <10 min from 600 °C to 50°C | <10 min from 600 °C to 50°C |
| Maximum Sample Size – solid | 26 mm (L) x 10 mm (D) | 26 mm (L) x 10 mm (D) |
| Maximum Sample Size- film/fiber | ||
| Static Operation | 26 mm (L) x 1.0 mm (T) x 4.7 mm (W) | 26 mm (L) x 1.0 mm (T) x 4.7 mm (W) |
| Dynamic Operation | 26 mm (L) x .35 mm (T) x 4.7 mm (W) | – |
| Measurement Precision | ±0.1% | ±0.1% |
| Sensitivity | 15 nm | 15 nm |
| Displacement Resolution | <0.5 nm | <0.5 nm |
| Dynamic Baseline Drift | <1μm (-100 to 500 °C) | <1μm (-100 to 500 °C) |
| Force Range | 0.001 to 2 N | 0.001 to 2 N |
| Frequency Range | 0.01 to 2 Hz | – |
| Mass Flow Control |
● |
● |
| Atmosphere (static or controlled flow) | Argon, Helium, Nitrogen, and Air | Argon, Helium, Nitrogen, and Air |
TMA measures material deformation changes under controlled conditions of force, atmosphere, time, and temperature. Force can be applied in compression, flexure, or tensile modes of deformation using specially-designed probes. TMA measures intrinsic material properties (e.g., expansion coefficient, glass transition, Young’s modulus), plus processing/product performance parameters (e.g., softening points).
These measurements have wide applicability and can be performed by either the Discovery TMA 450 or TMA 450EM. The TMA 450 features a Standard set of tests (temperature ramp, force ramp, and isostrain), while the TMA 450EM additionally offers Stress/Strain, Creep, Stress Relaxation, Dynamic TMA, and Modulated TMA™.
| Operational Modes |
TMA 450EM |
TMA 450 |
|
| Standard (Temperature ramp, Force ramp, Isostrain) |
● |
● |
|
| Stress/Strain |
● |
|
|
| Creep |
● |
○ |
|
| Stress Relaxation |
● |
○ |
|
| Dynamic TMA (DTMA) |
● |
○ |
|
| Modulated TMA™ (MTMA™) |
● |
○ |
● Available ○ Available as an optional upgrade
The POWER of TMA
TMA is critical for understanding compatibility of materials that must function together. Examples include:
- Coatings and their substrates
- Adjacent layers of laminates
- Resins or elastomers and their reinforcements or fillers
- Seals, or encapsulates, and the mechanical systems they protect
TMA helps determine the suitability of materials for use in harsh environments and at extreme temperature. Examples include:
- Brake linings
- Automotive gaskets
- Window seals
- Solder joints
- Adhesives
- Protective coatings
Thermomechanical analysis (TMA) measures material dimensional changes under controlled conditions of force, atmosphere, time, and temperature. In the typical operation of a TMA, a small sample with parallel and flat surfaces is placed on a quartz stage near a thermocouple. A quartz probe is lowered against the specimen with a constant applied force. As the sample is heated or cooled, changes in dimension are measured by monitoring the motion of the quartz probe.
Meeting and exceeding industry standards* for testing, the Discovery TMA 450 provides information about the material’s coefficient of linear thermal expansion (CTE), shrinkage, softening, glass transition temperature, heat deflection, and much more. Advanced tests expand the capabilities of the Discovery TMA 450 to enable scientists and engineers to get the most out of their data and their instrument investment.
* ASTM E831, E1545, D696, D3386 and ISO 11359: Parts 1-3
Furnace
Furnace
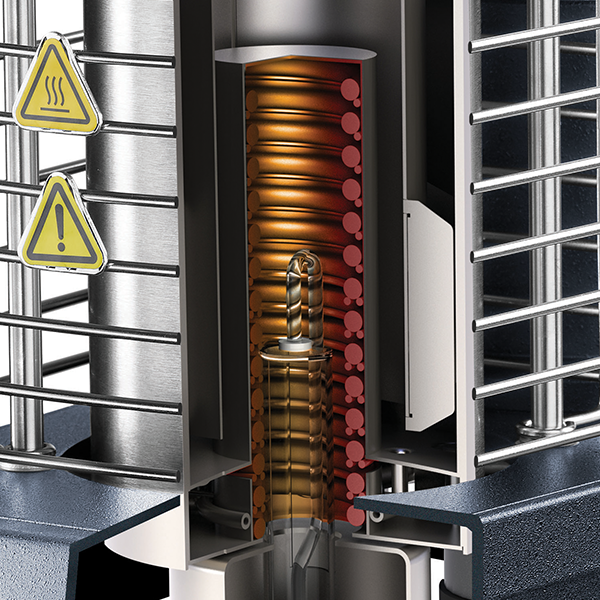
The TMA 450 features a highly-responsive low-mass furnace designed for the most precise control of temperature from -150 °C to 1000 °C and stable heating rates in the range of 0.01 to 150°C/min. The furnace ensures the superior baseline performance required for accurate dimension change measurements, as well as the dynamic temperature control required for Modulated TMA™ operation. The furnace air-cool feature facilitates experiment turnaround times in as little as 10 minutes, significantly improving laboratory productivity. The integrated Inconel® 718 Dewar atop the furnace enables liquid nitrogen cooling to -150 °C, or can be connected to the optional nitrogen-free Mechanical Cooling Accessory (MCA 70) for cooling to -70 °C. Cooling provides the ability to perform cyclic heating/cooling experiments, as well as further improving experiment turnaround times..
Sample Stage and Probes
Sample Stage and Probes
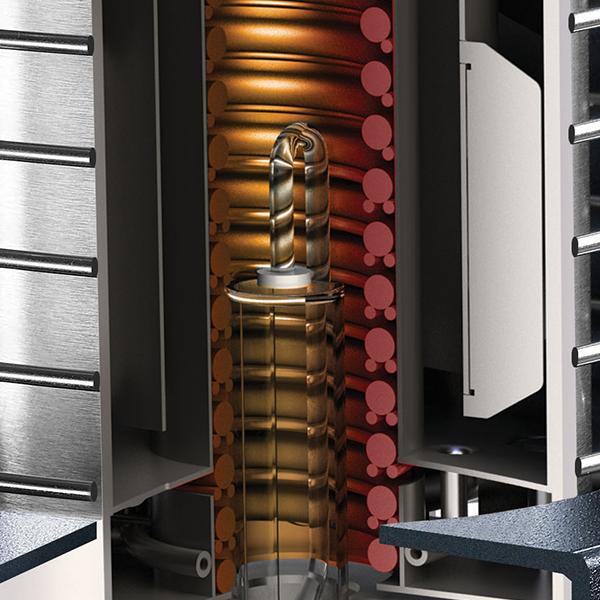
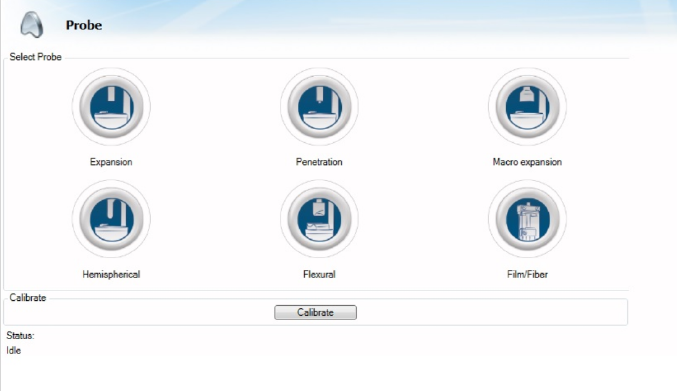
The sample stage and probes are made of quartz and are optimized for an operational range of -150 °C to 1000 °C. Quartz is an ideal material to use on the TMA 450 because of its rigidity, inertness to corrosion, and very low thermal expansivity. The easily accessible stage simplifies probe or fixture installation, sample mounting, and thermocouple placement. The quartz probes are designed to be used in expansion, penetration, flexural (3-point bend) and tension modes of deformation and are used to determine coefficient of thermal expansion (CTE), shrinkage, softening points, sintering temperatures, elongation, and much more. Integrated into the instrument design is a dual input gas delivery module that meters the flow of the purge gas to the sample area with flow rates from 0 to 200 mL/min of air, argon, helium, or nitrogen.
High Performance Displacement Transducer
High Performance Displacement Transducer
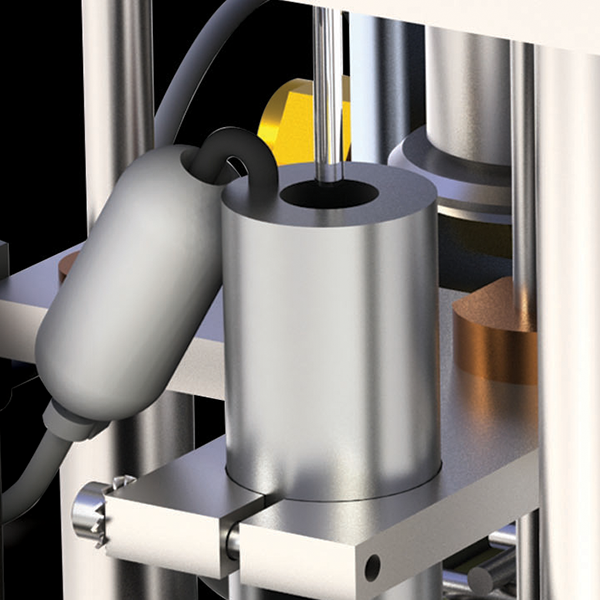
The wide-range, high-precision sample measurement system —heart of the TMA 450— generates an accurate output signal that is directly proportional to a sample’s dimension change. Its precise and reliable response over a wide temperature range (-150 to 1000 °C) ensures reproducible TMA results. The measurement system provides a resolution of 15 nm for sample lengths up to 26 mm and a dynamic measuring range of ±2.5 mm, making it possible to test a wide range of sample lengths. Ideally located below the furnace, it is protected from temperature effects, and ensures stable baseline performance and repeatability.
Friction-Free Force Motor
Friction-Free Force Motor
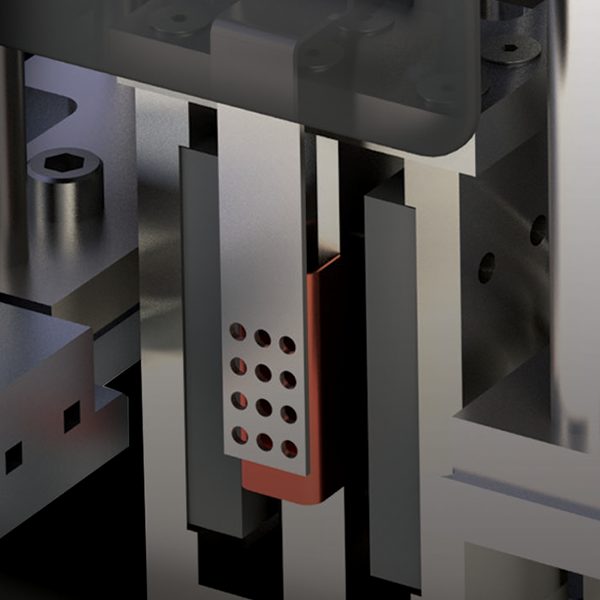
A non-contact motor provides a controlled, friction-free, calibrated force to the sample via a probe or fixture. The force is digitally programmed from 0.001 to 1 N, and can be increased manually to 2 N by addition of weights. The precision control of the force motor generates the static, ramped, or oscillatory dynamic forces necessary for quality measurements in all deformation modes. From standard temperature ramps using a controlled force to dynamic TMA employing small amplitude, fixedfrequency sinusoidal deformation, the Discovery TMA 450 is outfitted to capture a broad spectrum of material properties with the highest level of sensitivity and accuracy.
Inconel® is a registered trademark of Special Metals Corporation
Environmental Systems & Probes
Mechanical Cooling System
 Mechanical Cooling System
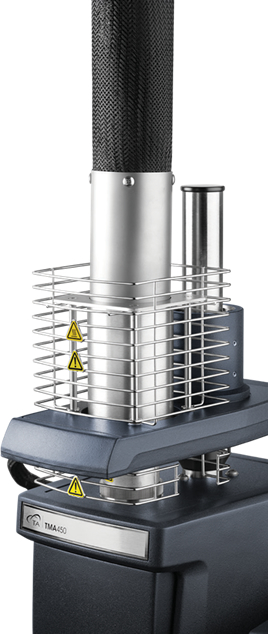
Take advantage of the convenient Mechanical Cooling Accessory, the MCA 70, for unattended TMA and Modulated TMATM (MTMATM) operation over a broad temperature range. The MCA 70 is ideal for cyclic heating/cooling experiments that are increasingly being used by manufacturers to test materials under conditions of actual use.
Temperature Cycle Testing (TCT) determines the ability of parts to withstand extremely low and high temperatures and cyclical exposures to these extremes. A mechanical failure resulting from cyclical thermomechanical loading is known as a fatigue, so temperature cycling primarily accelerates fatigue failures. The MCA 70 makes it easier than ever to study a materials’ response to extreme changes in temperature.
MCA 70 Features and Benefits:
- Two-stage refrigeration system that provides a temperature range of -70°C to 400°C
- Sealed system eliminates the need for liquid nitrogen cooling
- Enables cycling, Modulated TMA, controlled, and ballistic cooling experiments
- Safe,convenient, and continuous cooling operation for your laboratory needs
|
Controlled Rate |
To Lower Temperature |
|
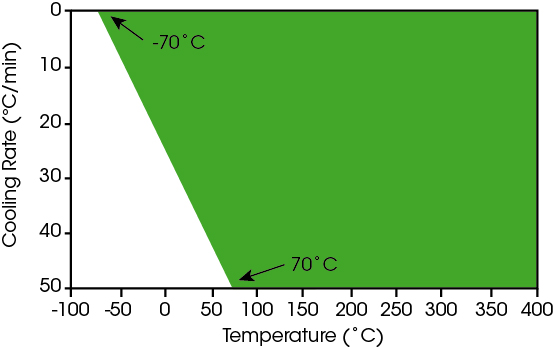
50℃/min |
70℃ |
|
20℃/min |
-15℃ |
|
10℃/min |
-40℃ |
|
5℃/min |
-55℃ |
|
2℃/min |
-65℃ |
* MCA 70 Controlled Cooling Rates, from 400oC (upper limit)
* Performance may vary slightly, depending on laboratory conditions
Cooling rate and temperature performance envelope of the MCA 70
* Obtained under an inert nitrogen atmosphere
* Performance may vary slightly, depending on laboratory conditions
Expansion Test Fixtures
Expansion
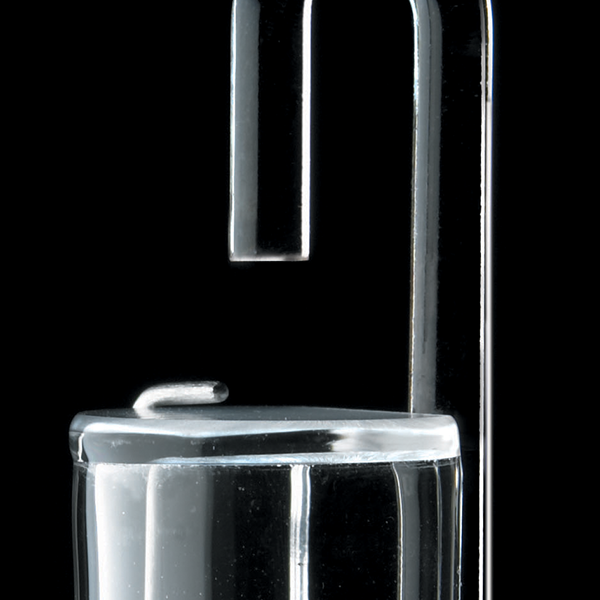
Expansion measurements determine a material’s coefficient of thermal expansion (CTE), glass transition temperature (Tg), and compression modulus. A flat-tipped standard expansion probe is placed on the sample (a small static force may be applied), and the sample is subjected to a temperature program. Probe movement records sample expansion or contraction. This test is used with most solid samples. The larger surface area of the macro-expansion probe facilitates analysis of soft or irregular samples, powders, and films, and the dilatometer fixture allows the determination of volumetric coefficient of thermal expansion.
 Expansion |
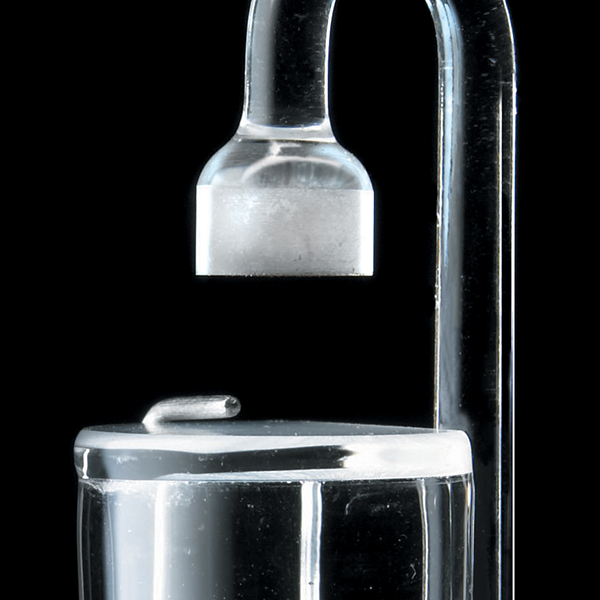 Macro Expansion |
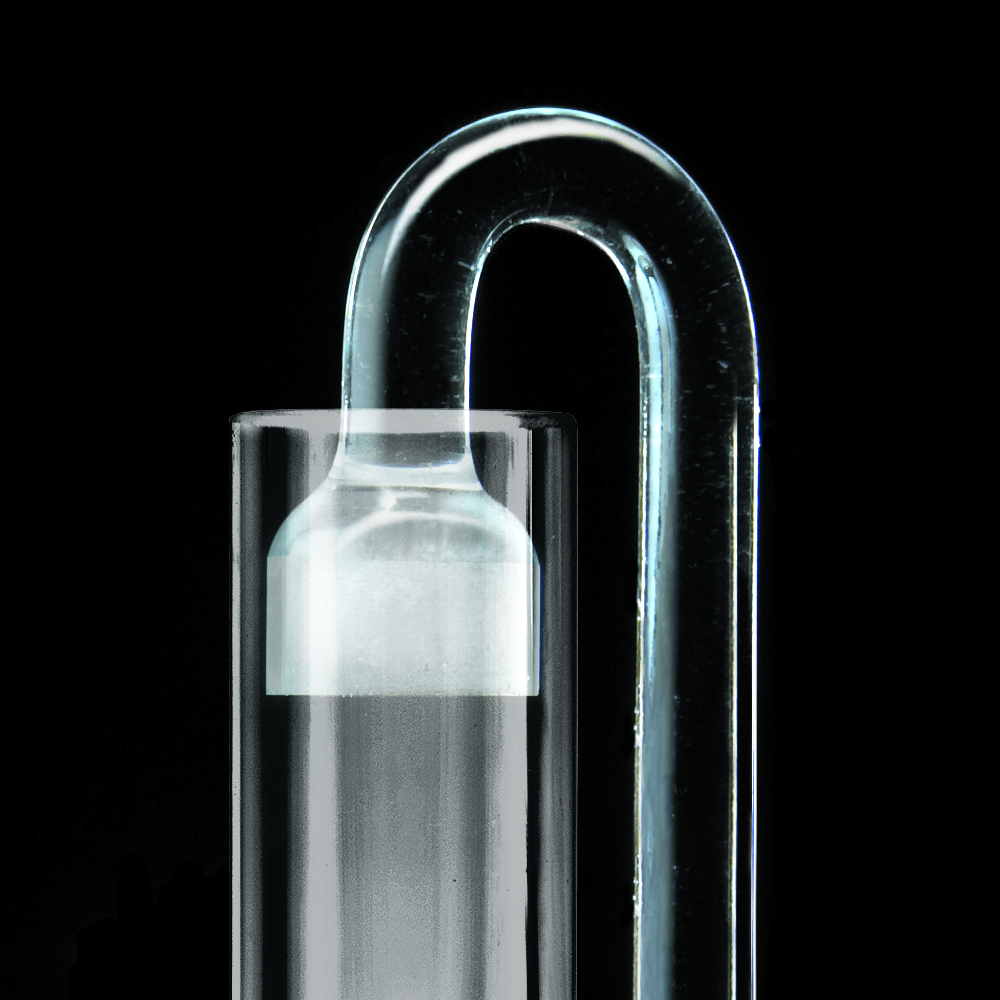 Volumetric |
Penetration Test Fixtures
Penetration
Penetration measurements use an extended tip probe to focus the drive force on a small area of the sample surface. This provides precise measurement of glass transition (Tg), softening, and melting behavior. It is valuable for characterizing coatings without their removal from a substrate. The probe operates like the expansion probe, but under a larger applied stress.The hemispherical probe is an alternate penetration probe for softening point measurements in solids.
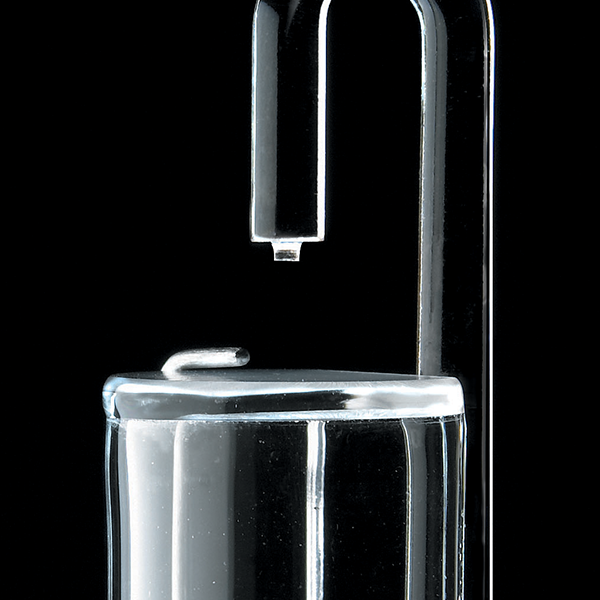 Penetration |
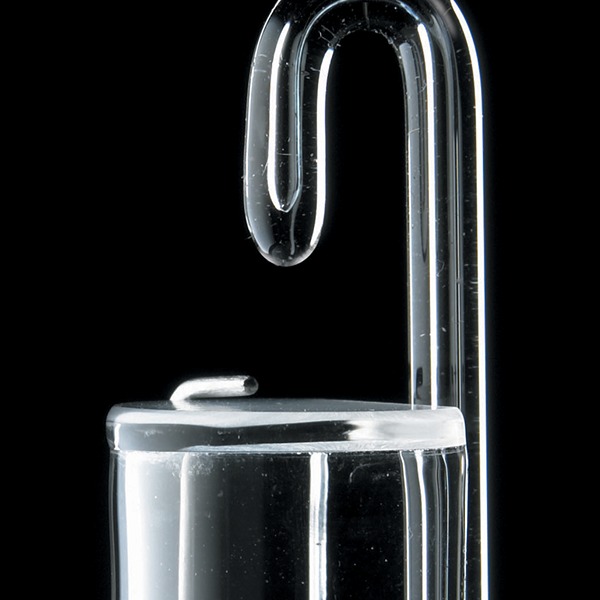 Hemispherical |
Tension Test Fixtures
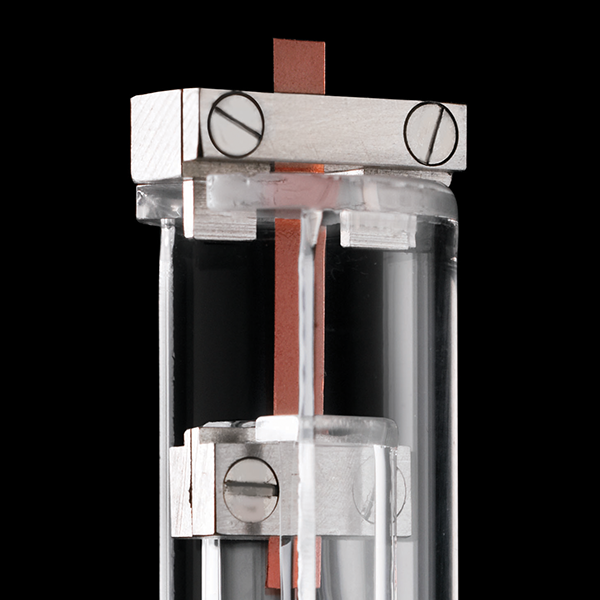 Tension
Tensile studies of the stress/strain properties of films and fibers are performed using a film/fiber probe assembly. An alignment fixture permits secure and reproducible sample positioning in the clamps.Application of a fixed force is used to generate stress/strain and modulus information.Additional measurements include shrinkage force,Tg, softening temperatures, cure, and cross-link density. Dynamic tests (e.g. Dynamic TMA, Modulated TMA™) in tension can be performed to determine viscoelastic parameters (e.g., E’, E”, tan delta), and to separate overlapping transitions.
3-Point Bending Test Fixtures
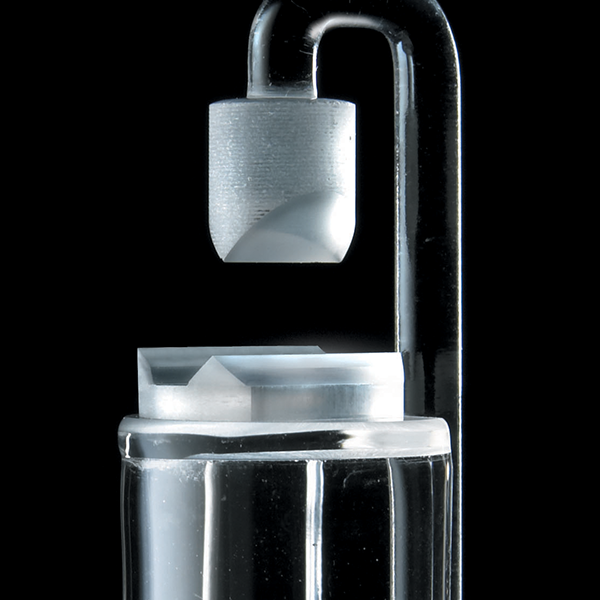 3-Point Bending
In this bending deformation (also known as flexure), the sample is supported at both ends on a two-point quartz anvil atop the stage. A fixed static force is applied vertically to the sample at its center via a wedge-shaped quartz probe. This test is considered to represent “pure” deformation, since clamping effects are eliminated. It is primarily used to determine bending properties of stiff materials (e.g., composites) and for distortion temperature measurements. Dynamic measurements are also available with the TMA 450EM, where a special low-friction metallic anvil replaces the quartz version.
 The Most VERSATILE CONTROL and ANALYSIS SOFTWARE!
TA Instruments’ state-of-the-art software package uses cutting-edge technology for instrument control, data collection, and data analysis for thermal analysis and rheology. The intuitive user interface allows you to simply and effectively program experiments, and move easily between processing experiments and viewing and analyzing data.
JSON Export
JSON Export: The Future of Data Management
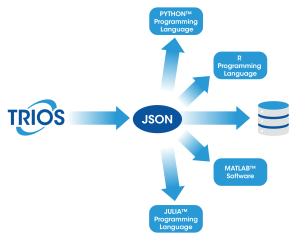
- Seamless Integration: Convert your TRIOS data into the open standard JSON format, making it easy to integrate with programming tools, data science workflows, and lab systems (e.g. LIMS). JSON is available:
- Automatically on every save (enabled in options)
- Through manual export dialogs
- As part of the “Send to LIMS” functionality
- Via the “Batch” processing dialog or from the command line
- In TRIOS AutoPilot
- Data Consistency: Our publicly available JSON schema ensures a consistent data structure, allowing you to write code once and apply it universally across all your data files.
- Python Library: Use our open-sourced python library, TA Data Kit, to simplify your data ingestion or learn how to take advantage of the power of our data with our code examples.
For more information, click here
TRIOS Features
TRIOS Features
- Control multiple instruments with a single PC and software package
- Overlayand compare results across techniques including TMA, DMA, DSC, TGA, SDT, and rheometers
- One-Click analysis for increased productivity
- Automatedcustomreport generation including: experimental details, data plots and tables, analysis results
- Convenient data export to plain-text, PDF, CSV, XML, Excel®, Word®, PowerPoint®, and image formats
- Optional TRIOS Guardian with electronic signatures for audit trail and data integrity
Excel®, Word®, and PowerPoint® are registered trademarks of Microsoft Corporation
Touch Screen
 Touch Screen
The Discovery TMA 450 features TA’s innovative touch screen, making operation easier than ever with enhanced One-Touch- Away™ functionality.
Touch Screen Features and Benefits:
- Ergonomic design for enhanced accessibility and productivity
- Packedwith functionality to simplify instrument operation
- Resilient, responsive touch screen for an enhanced user experience The One-Touch-Away™ interface includes:
- Start/stop controls Real-time signals and plot
- Active method viewing Temperaturesettings
- Probeand force calibrations Probe position and sample measurement settings
- System information Testand instrument status
The app-style touch screen, powerful new TRIOS software, and quick robust calibration routines work seamlessly to dramatically improve laboratory workflows and productivity.
Ease-of-Use
Ease-of-Use
TRIOS software makes calibration and operation of the TMA 450 simple. Users can easily generate multiple calibration data sets under varying experimental conditions (e.g. different heating rates or gas selections) and seamlessly switch between them to match the experimental conditions used for sample testing. Real-time signals and the progress of running experiments is readily available, with the added capability of modifying a running method on the fly. TRIOS software offers a level of flexibility that is unmatched in the industry.
Quick & Easy Calibration
Quick & Easy Calibration
TRIOS software makes calibrating the sample fixtures/probes and the TMA 450 effortless. Clear instructions, available on both the touch screen and TRIOS software, guide the operator through simple calibration steps that end with a summary report. The report provides calibration status at a glance and is stored with each data file to ensure data integrity.
Complete Data Record
Complete Data Record
The advanced data collection system automatically saves all relevant signals, active calibrations, and system settings. This comprehensive set of information is invaluable for method development, procedure deployment, and data validation.
Complete Data Analysis Capabilities
Complete Data Analysis Capabilities
A comprehensive set of relevant tools are available for real-time data analysis, even during experiments. Gain actionable insights into your material behavior through a powerful and versatile set of features seamlessly integrated into TRIOS.
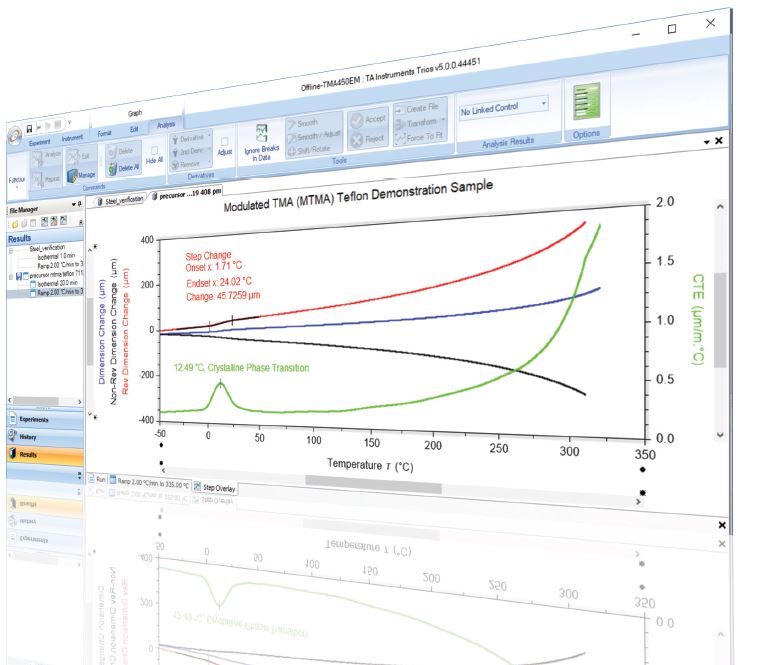
All Standard TMA Analyses:
- Alpha at X1 (CTE)
- Alpha at X1 to X2 (CTE)
- Alpha fit X1 to X2 (CTE)
- Onset and endset analysis
- Dimension change (absolute and %)
- Signal maximum and minimum
- Steptransition
- Curve values at specific X or Y points
- 1st and 2nd derivatives
- Mathematical fitting: straight line, polynomial, or exponential
Advanced Analysis Capabilities on the TMA 450EM:
- Storageand loss moduli, with tan delta peak analysis when using Dynamic TMA
- Deconvolution of the Total Dimension Change signal with Modulated TMATM (MTMATM) into Reversing and Non-Reversing dimension change signals for separating expansion from contraction, shrinkage, and stress relaxation
Standard Operational Tests
TMA measures material deformation changes under controlled conditions of force, atmosphere, time, and temperature. Force can be applied in compression, flexure, or tensile modes of deformation using specially-designed probes. TMA measures intrinsic material properties (e.g., expansion coefficient, glass transition, Young’s modulus), plus processing/product performance parameters (e.g., softening points).
These measurements have wide applicability and can be performed by either the Discovery TMA 450 or TMA 450EM. The TMA 450 features a Standard set of tests (temperature ramp, force ramp, and isostrain), while the TMA 450EM additionally offers Stress/Strain, Creep, Stress Relaxation, Dynamic TMA, and Modulated TMA™.
Theory
Theory
Thermomechanical analysis (TMA) measures material dimensional changes under controlled conditions of force, atmosphere, time, and temperature. In the typical operation of a TMA, a small sample with parallel and flat surfaces is placed on a quartz stage near a thermocouple. A quartz probe is lowered against the specimen with a constant applied force. As the sample is heated or cooled, changes in dimension are measured by monitoring the motion of the quartz probe.
Meeting and exceeding industry standards* for testing, the Discovery TMA 450 provides information about the material’s coefficient of linear thermal expansion (CTE), shrinkage, softening, glass transition temperature, heat deflection, and much more.
Advanced tests expand the capabilities of the Discovery TMA 450 to enable scientists and engineers to get the most out of their data and their instrument investment.
The three most commonly used experiments are included on the Discovery TMA 450 as standard tests; these include the temperature ramp, force ramp and isostrain test templates.
Temperature Ramp | Monitor Displacement or Strain
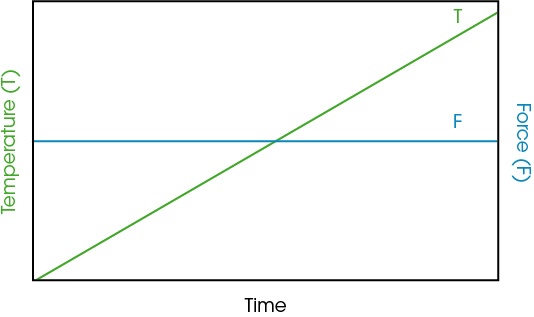
Force is held constant and displacement is monitored under a linear temperature ramp to provide intrinsic property measurements.
Force Ramp | Monitor Displacement or Strain
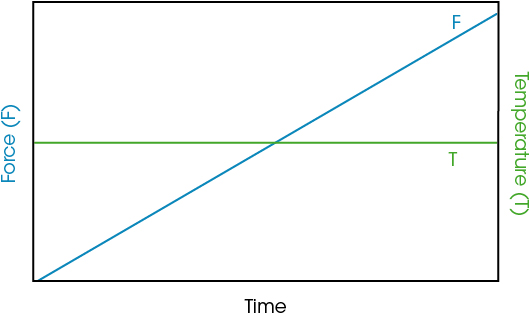
Force is ramped and resulting strain is measured at constant temperature to generate force/displacement plots and modulus assessment.
Isostrain | Monitor Force
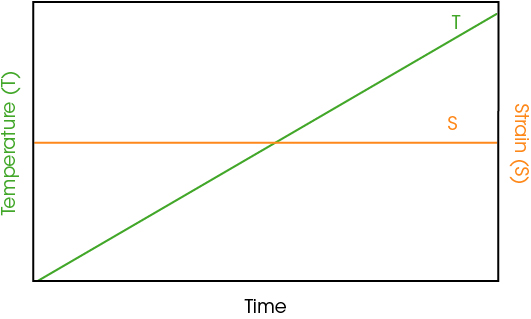
Strain is held constant and the force required to maintain the strain is monitored under a temperature ramp.This permits assessment of shrinkage forces in materials such as films/fibers.
Coefficient of Thermal Expansion
Coefficient of Thermal Expansion
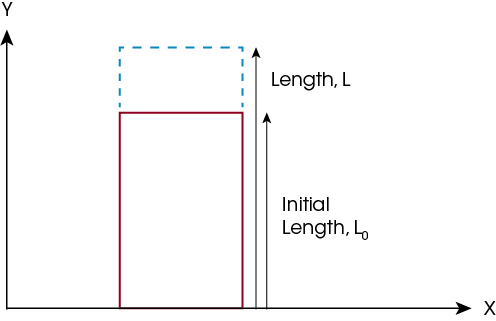
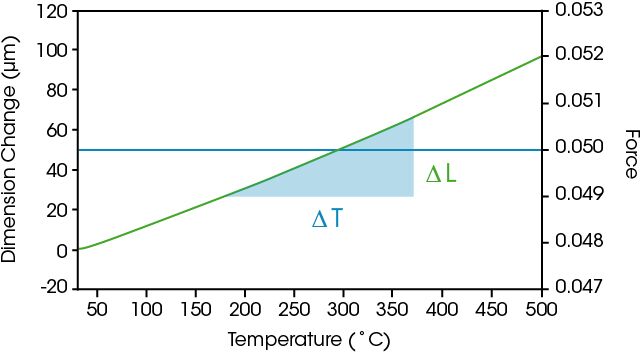
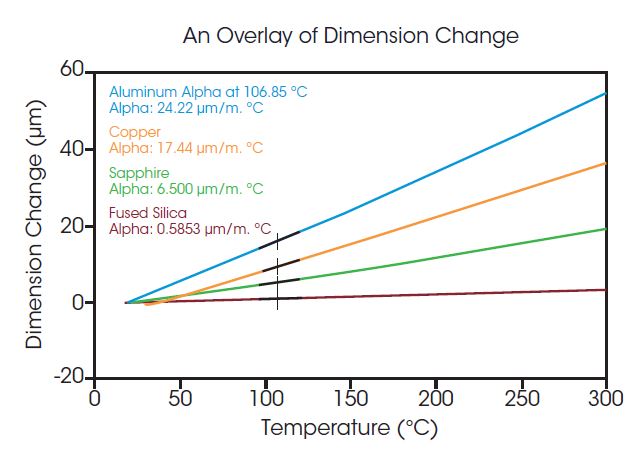
The most common property measured on a TMA is the coefficient of thermal expansion (CTE) per international standards documented in ASTM E831, D969, D3380 and ISO 11359 Parts 1-3. The CTE describes the mechanical expansion or contraction of a material at different temperatures. It is an important property of a material, and neglecting to take into account the effect temperature has on the physical size of materials has been known to cause product failures and delamination. The mean coefficient of thermal expansion (CTE) is calculated as:
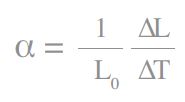
where α is the mean coefficient of thermal expansion, ∆L is the expansion of the specimen (mm) over a specified temperature range, L0 is the initial specimen length (mm), and ∆T is the temperature change (ºC) through the test. The CTE of a material is temperature dependent, and α is a reported mean for a particular temperature range.
Distortion Temperature
Distortion Temperature in 3-Point Bending
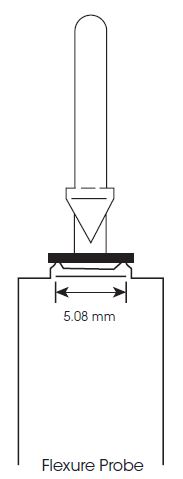 Heat Deflection Temperature (HDT) and Deflection Temperature Under Load (DTUL) are equivalent terms that reflect the temperature at which a material subjected to a 3-point bending load deforms to a pre-determined position. The actual force applied to the sample and the amount of deflection required depend upon the sample geometry.
ASTM standard E2092, and a related standard D648, defines DTUL as the temperature at which a precise strain (either 0.25 mm deflection or 0.20% strain as defined by sample dimensions in the procedure*) occurs under a specific stress (either 455 or 1820 kPa). With the TMA, the loads (force) needed to achieve these stresses can be determined using the equation listed below.
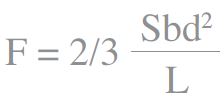 where F is the force (N), S is stress (0.455 MPa [66 psi] or 1.82 MPa [264 psi]), b is the sample width (mm), d is the sample thickness (mm), and L is the sample length (5.08 mm as defined by the flexure probe geometry).
The deflection of the test specimen is recorded as a function of temperature at which the predetermined level of strain is observed. The deflection or dimension change is determined using the relationship in the equation shown below.
 where D is the TMA dimension change at center span (mm) and r is Sample strain (0.0020 or 0.20%).
Deflection temperature under load (DTUL) testing is easily conducted on the Discovery 450 TMA. Polystyrene, polysulfone, and polyphenylene sulfide were tested using the three-point flexure probe with a 0.455 MPa (66psi) load, 0.2% strain, and 2°C/min heating. The DTUL measurements of these materials distinguish between their ability to bare a load at elevated temperatures and determine the temperature where rigidity is lost. The deflection temperature of a material can be modified through reformulation with compatible resins and fiber reinforcement. DTUL tests with small specimens are quick and easily conducted on the Discovery TMA 450.
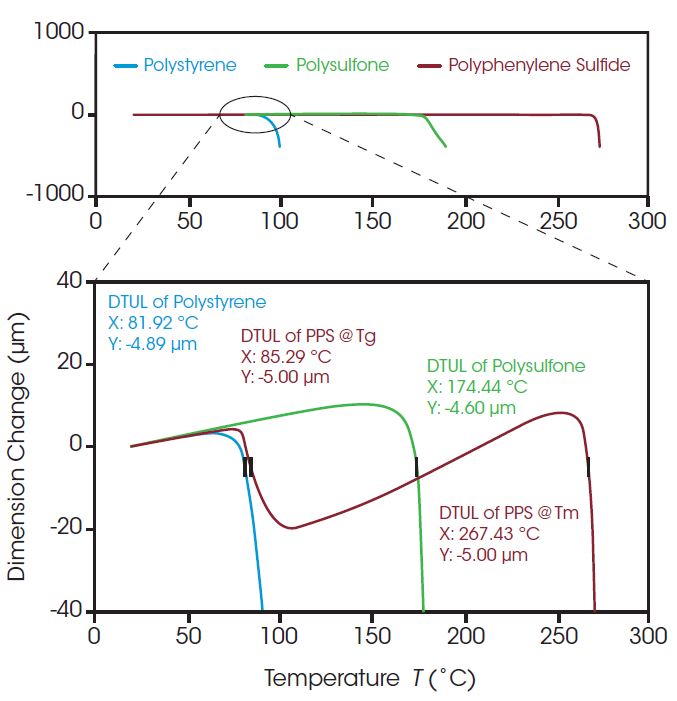
Calculated values for experimental force and dimensional change at center span when using conditions of 0.455 MPa stress, 0.2% strain, and a heating rate of 2°C/min.
| Sample | Sample Width (b) x Thickness (d) x Length (L) (mm) | Calculated Force, F (N) | Dimensional Change at center span, D (μm) |
| Polystyrene | 2.33 x 1.76 x 5.08 | 0.431 | 4.89 |
| Polysulfone | 2.30 x 1.87 x 5.08 | 0.480 | 4.60 |
| Polyphenylene sulfide | 2.36 x 1.72 x 5.08 | 0.417 | 5.00 |
Intrinsic and Product Property Measurements
Intrinsic and Product Property Measurements
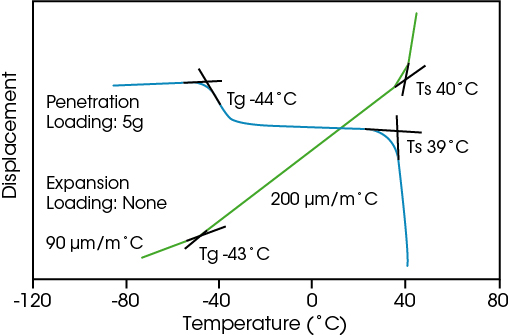
This figure shows expansion and penetration probe measurements of the Tg and the softening point of a synthetic rubber using a temperature ramp at constant applied force. The large CTE changes in the expansion plot indicate the transition temperatures. In penetration, the transitions are detected by the sharp deflection of the probe into the sample.
Penetration & Hemispherical
Penetration & Hemispherical
Softening Temperature (Ts) Determination
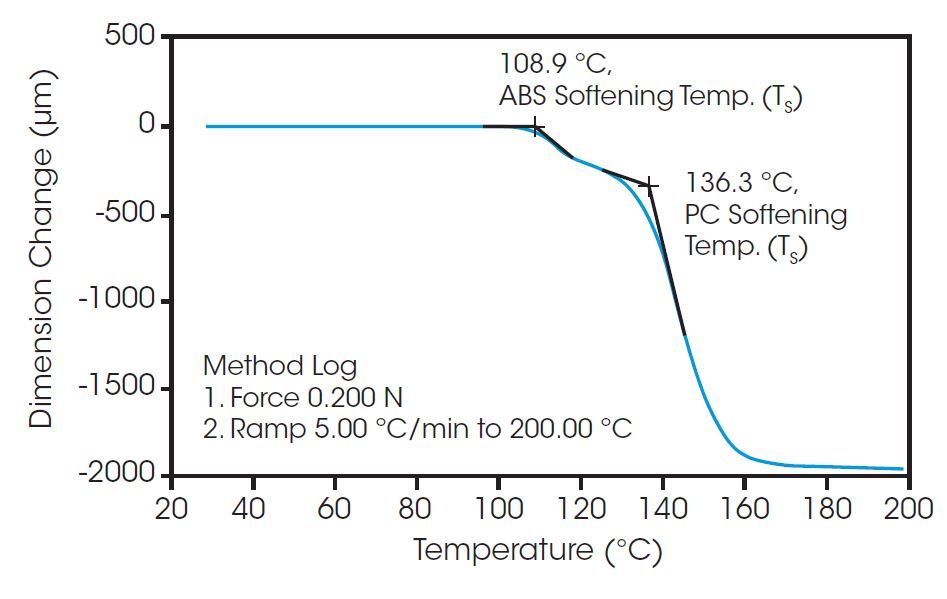
The penetration fixture was used to test polycarbonate/acrylonitrile-butadiene-styrene (PC/ABS), an amorphous thermoplastic blend, at a controlled heating rate of 5 °C/min and a constant force of 0.2 N. Conditions outlined in ASTM E1545 and ISO 11359 were followed in the assignment of the softening temperature/glass transition by penetration. The softening points are easily detected as a negative deflection in dimension change, and individual softening points were observed for each component of this blend.
Thermal Stress Analysis of Fibers
Thermal Stress Analysis of Fibers
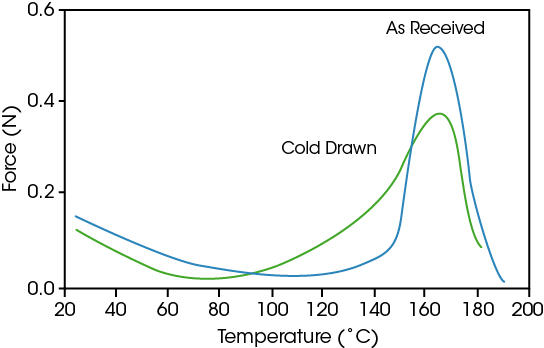
This figure displays a tensile test experiment, using a temperature ramp at a constant strain (1%), to perform a stress analysis on a polyolefin fiber, as received, and after cold drawing. The plot shows the forces needed to maintain the set strain as a function of temperature. The data has been correlated with key fiber industry processing parameters, such as shrink force, draw temperature, draw ratio, elongation at break, and knot strength..
Shrinkage Force Testing
Shrinkage Force Testing
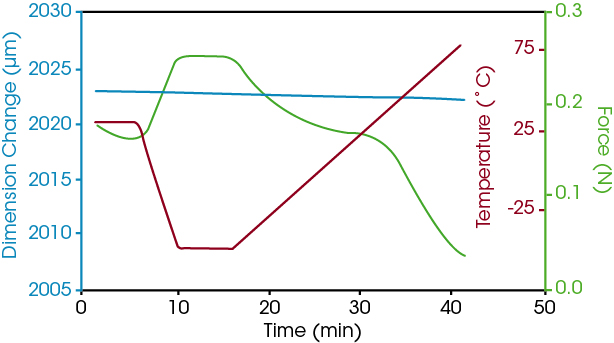
This figure illustrates a classic shrinkage force (isostrain) experiment in the tensile mode on a food wrapping film. The film was strained to 20% at room temperature for 5 minutes, cooled to -50 °C and held for more than 5 minutes, then heated at 5 °C/min to 75 °C. The plot shows the force variation (shrinkage force) required to maintain a set strain in the film. This test simulates film use from freezer to the microwave.
Advanced Operational Tests
Advanced testing capabilities include TA’s industry-leading Modulated TMATM for the most efficient separation of simultaneous expansion and contraction of a material, Dynamic TMA for viscoelastic properties by small amplitude, fixed-frequency sinusoidal deformation, and Creep/Stress Relaxation for viscoelastic behavior under transient conditions. These advanced options extend and empower scientists and engineers with even more valuable information about the mechanical behavior of materials.
Theory
Stress/Strain Tests
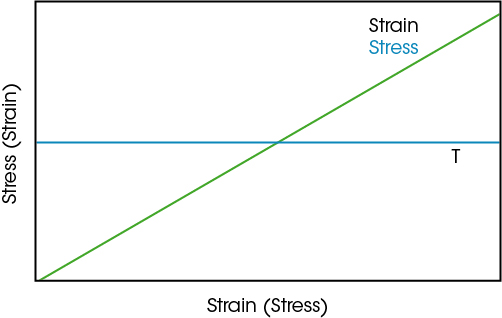
Stress or strain is ramped, and the resulting strain or stress is measured at a constant temperature. Using customer-entered sample geometry factors, the data provides both stress/strain plots and related modulus information. In addition, calculated modulus can be displayed as a function of stress, strain, temperature, or time.
Creep and Stress Relaxation
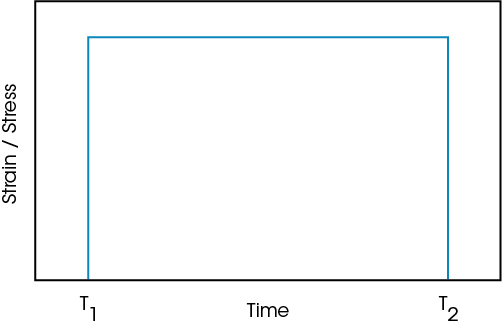
TMA can also measure viscoelastic properties using transient (creep or stress relaxation) tests. In a creep experiment, input stress is held constant, and resulting strain is monitored as a function of time. In a stress relaxation experiment, input strain is held constant, and stress decay is measured as a function of time. The data can also be displayed in units of compliance (creep test) and stress relaxation modulus (stress relaxation test).
Modulated TMA™ (MTMA™)
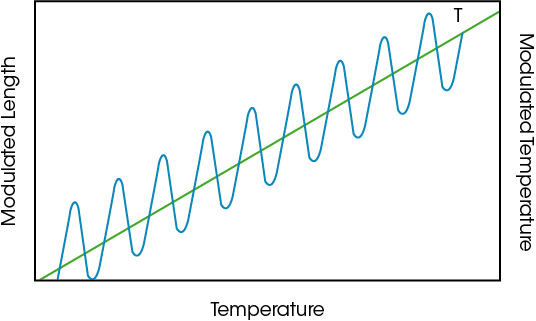
TA’s industry-leading Modulated TMATM efficiently separates simultaneous expansion and contraction in a material. Through deconvolution of the total dimensional change, an event such as the glass transition occurring in the same temperature region as stress relaxation is easily revealed. In Modulated TMATM (MTMATM), the sample experiences the combined effects of a sinusoidal temperature oscillation overlaid on the traditional linear ramp. The output signals (after Fourier transformation of the raw data) are total displacement and the change in thermal expansion coefficient.
Modulated TMA separates the total displacement into Reversing and Non-Reversing dimensional change signals. The reversing signal contains events attributable to dimension changes and is useful in detecting related events such as the Tg. The non-reversing signal contains events that relate to timedependent kinetic processes (e.g., stress relaxation). This technique is unique to the TA Instruments Discovery TMA 450EM.
Dynamic TMA Tests
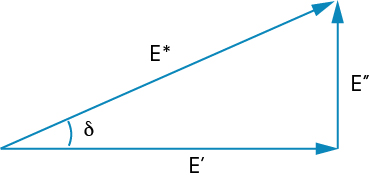
In Dynamic TMA (DTMA), a sinusoidal force and linear temperature ramp are applied to the sample (Figure A), and the resulting sinusoidal strain and sine wave phase difference (δ) are measured (Figure B). From this data, storage modulus (E’), loss modulus (E”), and tan δ (E”/E’) are calculated as functions of temperature, time, or stress (Figure C). Dynamic TMA enables the scientist or engineer to obtain the viscoelastic behavior of materials.
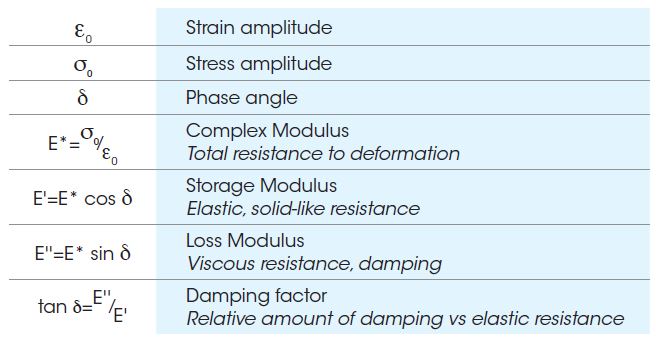
Figure A
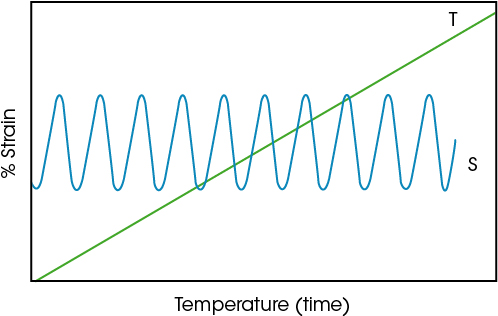
Figure B
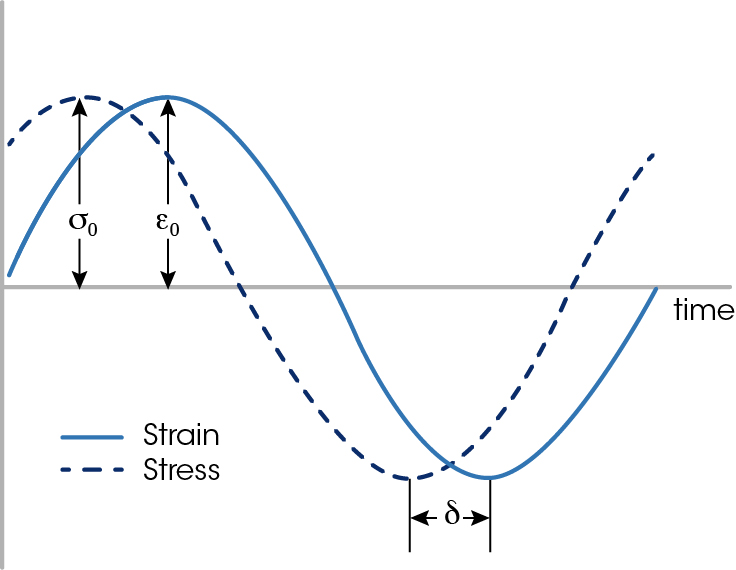
Figure C
Film Tensile Testing
Film Tensile Testing
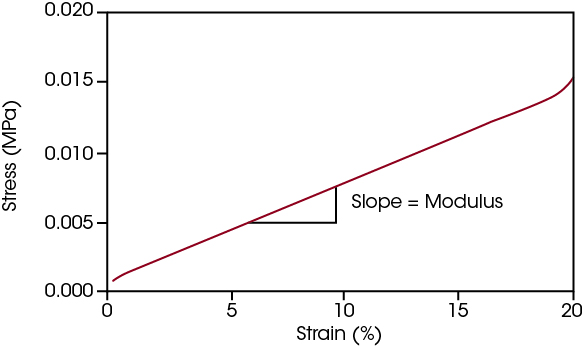
The figure above displays a strain ramp experiment at a constant temperature on a polymeric film in tension. The plot shows an extensive region where stress and strain are linearly related, and over which a tensile modulus can be directly determined. Quantitative modulus data can also be plotted as a function of stress, strain, time, or temperature. The results show the ability of the TMA 450EM to function as a mini tensile tester for films and fibers.
Tension
Fiber Stress/Strain Measurements
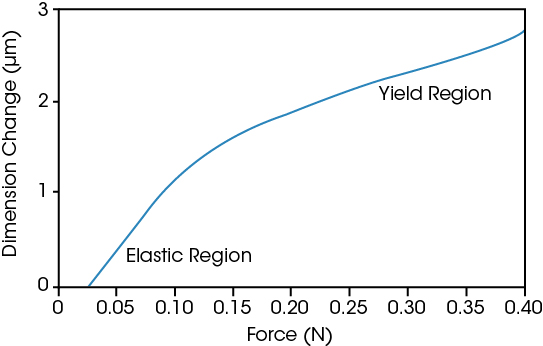
Stress/strain measurements are widely used to assess and compare materials. The figure shows the different regions of stress/strain behavior in a 25 μm polyamide fiber in tension, subjected to a force ramp at a constant temperature. The fiber undergoes instantaneous deformation, retardation, linear stress/strain response, and yield elongation. Other parameters (e.g., yield stress, Young’s modulus) can be determined.
Creep Analysis
Creep Analysis
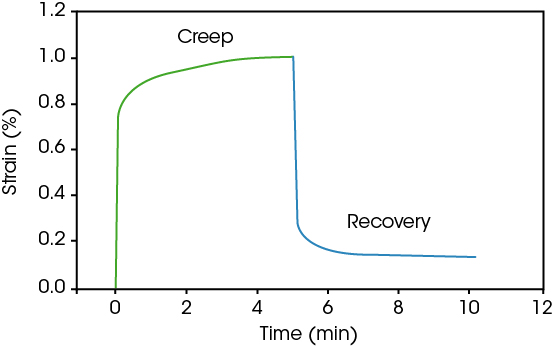
Creep tests are valuable in materials selection for applications where stress changes are anticipated. This example illustrates an ambient temperature creep study on a polyethylene film in tension. It reveals the instantaneous deformation, retardation, and linear regions of strain response to the set stress, plus its recovery with time, at zero stress. The data can also be plotted as compliance, and recoverable compliance, versus time.
Stress Relaxation Analysis
Stress Relaxation Analysis
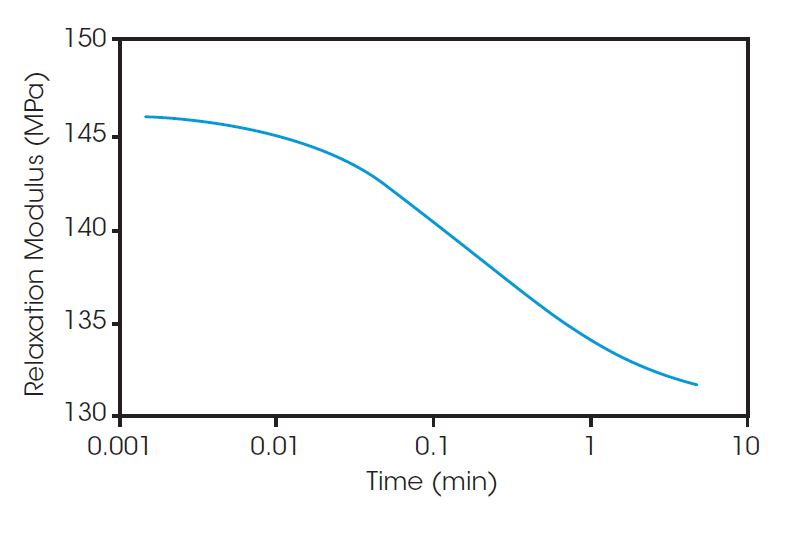
This figure shows a stress relaxation test in tension on the same polyolefin film used for the creep study in the previous example. A known strain is applied to the film and maintained while its change in stress is monitored. The plot shows a typical decay in the stress relaxation modulus. Such tests also help engineers design materials for end uses where changes in deformation can be expected.
Separating Overlapping Transitions
Separating Overlapping Transitions – Modulated TMA
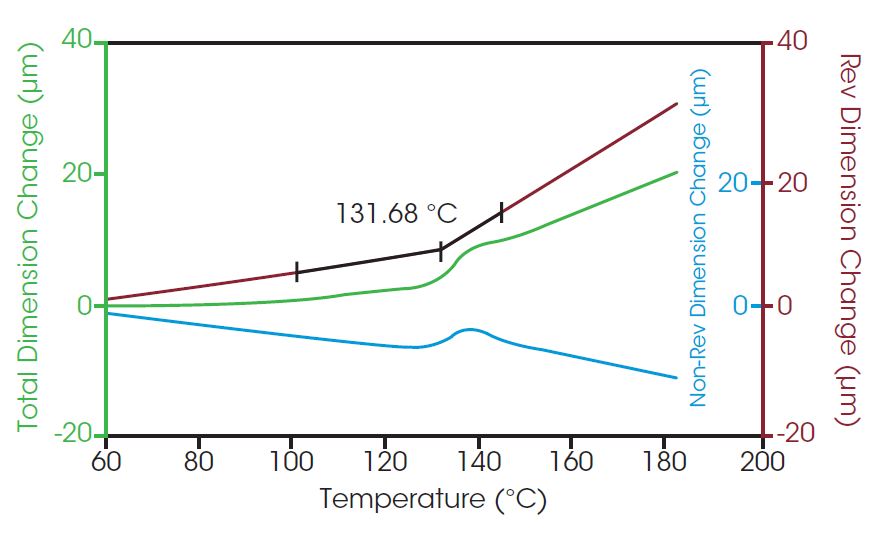
The figure to the right shows an MTMA study to determine the Tg of a printed circuit board (PCB). The signals plotted are the total dimension change, plus its reversing and non-reversing components. The total signal is identical to that from standard TMA, but does not uniquely define the Tg. The component signals, however, clearly separate the actual Tg from the stress relaxation event induced by processing conditions of the PCB.
Viscoelastic Property Determination
Viscoelastic Property Determination – Dynamic TMA
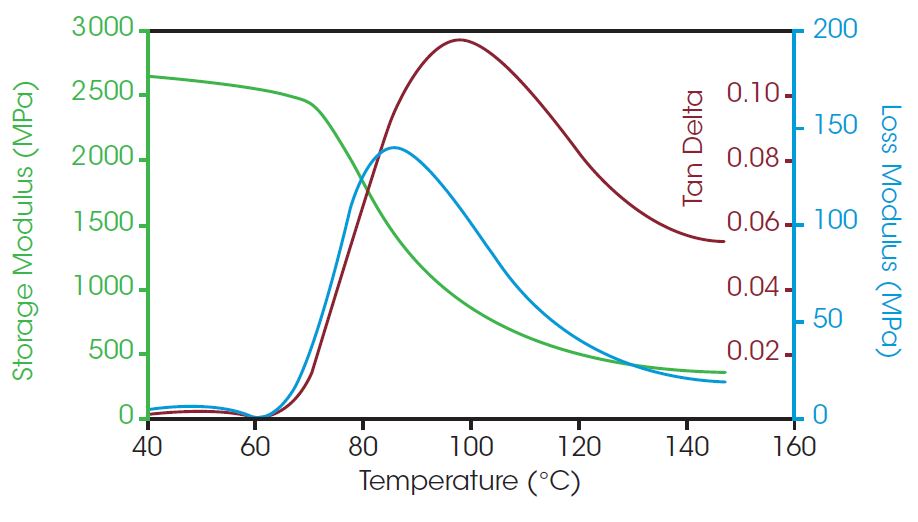
This figure illustrates a dynamic test in which a semi-crystalline polyethylene terephthate (PET) film in tension is subjected to a fixed sinusoidal force during a linear temperature ramp. The resulting strain and phase data are used to calculate the material’s viscoelastic properties (e.g., E’, E”, and tan δ). The plotted data shows dramatic modulus changes as the film is heated through its glass transition temperature.
 TMA 450 Brochure
- Transition Temperature of Liquid Samples by Thermomechanical Analysis
- The Correlation of TMA with ASTM Modulus Data
- A New Cyclic TMA Test Protocol for Evaluation of Electronic & Dielectric Materials
- Stress/Strain Evaluation of Fibers Using TMA
- Thermal History Determination of Textured Polyester Yarn
- Determining Minimum Usable Sample Thickness in TMA
- Calibration of TMA According to ASTM Standard Method E-831
- Determination of the Dimensional Stability of a Thin PET Film
- Simulating DTUL (ASTM D 648) Experiments with the TMA
- Characterization of Polymer Film by TMA Penetration
- Description
-
DISCOVER the WORLD’S FINEST THERMOMECHANICAL ANALYZER
TA Instruments invites you to experience the finest in Thermomechanical Analyzers, the Discovery TMA 450. Discover the advanced engineering and attention to detail that provides enhancements in every aspect of performance and a new level of user experience. Featuring advanced testing capabilities and the widest range of fixtures, the Discovery TMA 450 is sure to meet and exceed your expectations. It’s never been easier to get great TMA data!
Features & Benefits
- Non-contact, friction-free motor delivers forces from 0.001 N to 2 N enabling measurements on the widest range of samples from soft compressible elastomers to stiff composite materials.
- Wide-range, high-resolution measurement transducer accommodates sample lengths up to 26 mm, a measuring range of ±2.5 mm with resolution as low as 15 nm for an accurate dimensional change measurement.
- Advanced testing modes of Modulated TMA (MTMATM), Dynamic TMA, Creep and Stress Relaxation extend capabilities and empower users with even more valuable information about the mechanical behavior of materials.
- Convenient Mechanical Cooling Accessory (MCA 70) provides controlled cooling to -70 °C without the cost or hassle of liquid nitrogen.
- Powerful TRIOS software delivers exceptional user experience and ease-of-use in a combined package for instrument control, data analysis, and reporting, reducing training times and raising productivity to new levels.
- New, innovative, “app-style” touch screen puts instrument functionality simply One-Touch-Away™, enhancing usability and making it easier than ever to get great data.
- Every instrument comes with a commitment to quality backed by the industry’s ONLY five-year furnace warranty for peace of mind.
With the ever-increasing demands for higher performing materials to meet the needs of challenging applications, understanding how a material reacts to its environment is more important than ever. Meeting and exceeding industry standards* for testing, the Discovery TMA 450 provides information about the material’s coefficient of linear thermal expansion (CTE), shrinkage, softening, glass transition temperatures, and much more.
The advanced options can be used to obtain viscoelastic properties such as the material’s stiffness (modulus), damping properties (tan delta), creep, and stress relaxation. The TMA 450 is particularly useful for measuring these material properties locally, especially in manufactured components or assemblies where compatibility of materials is paramount.
* ASTM E831, E1545, D696, D3386 and ISO 11359: Parts1-3
- Specs.
-
Specifications
Discovery TMA 450EM Discovery TMA 450 Temperature Range (max) -150 to 1000 °C -150 to 1000 °C Temperature Precision ±1°C ±1°C Heating Rate 0.01 to 150 °C/min 0.01 to 150 °C/min Furnace Cool Down Time (air cooling) <10 min from 600 °C to 50°C <10 min from 600 °C to 50°C Maximum Sample Size – solid 26 mm (L) x 10 mm (D) 26 mm (L) x 10 mm (D) Maximum Sample Size- film/fiber Static Operation 26 mm (L) x 1.0 mm (T) x 4.7 mm (W) 26 mm (L) x 1.0 mm (T) x 4.7 mm (W) Dynamic Operation 26 mm (L) x .35 mm (T) x 4.7 mm (W) – Measurement Precision ±0.1% ±0.1% Sensitivity 15 nm 15 nm Displacement Resolution <0.5 nm <0.5 nm Dynamic Baseline Drift <1μm (-100 to 500 °C) <1μm (-100 to 500 °C) Force Range 0.001 to 2 N 0.001 to 2 N Frequency Range 0.01 to 2 Hz – Mass Flow Control ●
●
Atmosphere (static or controlled flow) Argon, Helium, Nitrogen, and Air Argon, Helium, Nitrogen, and Air TMA measures material deformation changes under controlled conditions of force, atmosphere, time, and temperature. Force can be applied in compression, flexure, or tensile modes of deformation using specially-designed probes. TMA measures intrinsic material properties (e.g., expansion coefficient, glass transition, Young’s modulus), plus processing/product performance parameters (e.g., softening points).
These measurements have wide applicability and can be performed by either the Discovery TMA 450 or TMA 450EM. The TMA 450 features a Standard set of tests (temperature ramp, force ramp, and isostrain), while the TMA 450EM additionally offers Stress/Strain, Creep, Stress Relaxation, Dynamic TMA, and Modulated TMA™.
Operational Modes TMA 450EM
TMA 450
Standard (Temperature ramp, Force ramp, Isostrain) ●
●
Stress/Strain ●
○
Creep ●
○
Stress Relaxation ●
○
Dynamic TMA (DTMA) ●
○
Modulated TMA™ (MTMA™) ●
○
● Available ○ Available as an optional upgrade
- Technology
-
The POWER of TMA
TMA is critical for understanding compatibility of materials that must function together. Examples include:
- Coatings and their substrates
- Adjacent layers of laminates
- Resins or elastomers and their reinforcements or fillers
- Seals, or encapsulates, and the mechanical systems they protect
TMA helps determine the suitability of materials for use in harsh environments and at extreme temperature. Examples include:
- Brake linings
- Automotive gaskets
- Window seals
- Solder joints
- Adhesives
- Protective coatings
Thermomechanical analysis (TMA) measures material dimensional changes under controlled conditions of force, atmosphere, time, and temperature. In the typical operation of a TMA, a small sample with parallel and flat surfaces is placed on a quartz stage near a thermocouple. A quartz probe is lowered against the specimen with a constant applied force. As the sample is heated or cooled, changes in dimension are measured by monitoring the motion of the quartz probe.
Meeting and exceeding industry standards* for testing, the Discovery TMA 450 provides information about the material’s coefficient of linear thermal expansion (CTE), shrinkage, softening, glass transition temperature, heat deflection, and much more. Advanced tests expand the capabilities of the Discovery TMA 450 to enable scientists and engineers to get the most out of their data and their instrument investment.
* ASTM E831, E1545, D696, D3386 and ISO 11359: Parts 1-3
Furnace
Furnace

The TMA 450 features a highly-responsive low-mass furnace designed for the most precise control of temperature from -150 °C to 1000 °C and stable heating rates in the range of 0.01 to 150°C/min. The furnace ensures the superior baseline performance required for accurate dimension change measurements, as well as the dynamic temperature control required for Modulated TMA™ operation. The furnace air-cool feature facilitates experiment turnaround times in as little as 10 minutes, significantly improving laboratory productivity. The integrated Inconel® 718 Dewar atop the furnace enables liquid nitrogen cooling to -150 °C, or can be connected to the optional nitrogen-free Mechanical Cooling Accessory (MCA 70) for cooling to -70 °C. Cooling provides the ability to perform cyclic heating/cooling experiments, as well as further improving experiment turnaround times..
Sample Stage and Probes
Sample Stage and Probes

The sample stage and probes are made of quartz and are optimized for an operational range of -150 °C to 1000 °C. Quartz is an ideal material to use on the TMA 450 because of its rigidity, inertness to corrosion, and very low thermal expansivity. The easily accessible stage simplifies probe or fixture installation, sample mounting, and thermocouple placement. The quartz probes are designed to be used in expansion, penetration, flexural (3-point bend) and tension modes of deformation and are used to determine coefficient of thermal expansion (CTE), shrinkage, softening points, sintering temperatures, elongation, and much more. Integrated into the instrument design is a dual input gas delivery module that meters the flow of the purge gas to the sample area with flow rates from 0 to 200 mL/min of air, argon, helium, or nitrogen.
High Performance Displacement Transducer
High Performance Displacement Transducer

The wide-range, high-precision sample measurement system —heart of the TMA 450— generates an accurate output signal that is directly proportional to a sample’s dimension change. Its precise and reliable response over a wide temperature range (-150 to 1000 °C) ensures reproducible TMA results. The measurement system provides a resolution of 15 nm for sample lengths up to 26 mm and a dynamic measuring range of ±2.5 mm, making it possible to test a wide range of sample lengths. Ideally located below the furnace, it is protected from temperature effects, and ensures stable baseline performance and repeatability.
Friction-Free Force Motor
Friction-Free Force Motor

A non-contact motor provides a controlled, friction-free, calibrated force to the sample via a probe or fixture. The force is digitally programmed from 0.001 to 1 N, and can be increased manually to 2 N by addition of weights. The precision control of the force motor generates the static, ramped, or oscillatory dynamic forces necessary for quality measurements in all deformation modes. From standard temperature ramps using a controlled force to dynamic TMA employing small amplitude, fixedfrequency sinusoidal deformation, the Discovery TMA 450 is outfitted to capture a broad spectrum of material properties with the highest level of sensitivity and accuracy.
Inconel® is a registered trademark of Special Metals Corporation
- Accessories
-
Environmental Systems & Probes
Mechanical Cooling System
 Mechanical Cooling System
Take advantage of the convenient Mechanical Cooling Accessory, the MCA 70, for unattended TMA and Modulated TMATM (MTMATM) operation over a broad temperature range. The MCA 70 is ideal for cyclic heating/cooling experiments that are increasingly being used by manufacturers to test materials under conditions of actual use.
Temperature Cycle Testing (TCT) determines the ability of parts to withstand extremely low and high temperatures and cyclical exposures to these extremes. A mechanical failure resulting from cyclical thermomechanical loading is known as a fatigue, so temperature cycling primarily accelerates fatigue failures. The MCA 70 makes it easier than ever to study a materials’ response to extreme changes in temperature.
MCA 70 Features and Benefits:
- Two-stage refrigeration system that provides a temperature range of -70°C to 400°C
- Sealed system eliminates the need for liquid nitrogen cooling
- Enables cycling, Modulated TMA, controlled, and ballistic cooling experiments
- Safe,convenient, and continuous cooling operation for your laboratory needs
Controlled Rate
To Lower Temperature
50℃/min
70℃
20℃/min
-15℃
10℃/min
-40℃
5℃/min
-55℃
2℃/min
-65℃
* MCA 70 Controlled Cooling Rates, from 400oC (upper limit)
* Performance may vary slightly, depending on laboratory conditionsCooling rate and temperature performance envelope of the MCA 70

* Obtained under an inert nitrogen atmosphere
* Performance may vary slightly, depending on laboratory conditions
Expansion Test Fixtures
Expansion
Expansion measurements determine a material’s coefficient of thermal expansion (CTE), glass transition temperature (Tg), and compression modulus. A flat-tipped standard expansion probe is placed on the sample (a small static force may be applied), and the sample is subjected to a temperature program. Probe movement records sample expansion or contraction. This test is used with most solid samples. The larger surface area of the macro-expansion probe facilitates analysis of soft or irregular samples, powders, and films, and the dilatometer fixture allows the determination of volumetric coefficient of thermal expansion.

Expansion
Macro Expansion
Volumetric
Penetration Test Fixtures
Penetration
Penetration measurements use an extended tip probe to focus the drive force on a small area of the sample surface. This provides precise measurement of glass transition (Tg), softening, and melting behavior. It is valuable for characterizing coatings without their removal from a substrate. The probe operates like the expansion probe, but under a larger applied stress.The hemispherical probe is an alternate penetration probe for softening point measurements in solids.

Penetration
Hemispherical
Tension Test Fixtures
 Tension
Tensile studies of the stress/strain properties of films and fibers are performed using a film/fiber probe assembly. An alignment fixture permits secure and reproducible sample positioning in the clamps.Application of a fixed force is used to generate stress/strain and modulus information.Additional measurements include shrinkage force,Tg, softening temperatures, cure, and cross-link density. Dynamic tests (e.g. Dynamic TMA, Modulated TMA™) in tension can be performed to determine viscoelastic parameters (e.g., E’, E”, tan delta), and to separate overlapping transitions.
3-Point Bending Test Fixtures
 3-Point Bending
In this bending deformation (also known as flexure), the sample is supported at both ends on a two-point quartz anvil atop the stage. A fixed static force is applied vertically to the sample at its center via a wedge-shaped quartz probe. This test is considered to represent “pure” deformation, since clamping effects are eliminated. It is primarily used to determine bending properties of stiff materials (e.g., composites) and for distortion temperature measurements. Dynamic measurements are also available with the TMA 450EM, where a special low-friction metallic anvil replaces the quartz version.
- Software
-
 The Most VERSATILE CONTROL and ANALYSIS SOFTWARE!
TA Instruments’ state-of-the-art software package uses cutting-edge technology for instrument control, data collection, and data analysis for thermal analysis and rheology. The intuitive user interface allows you to simply and effectively program experiments, and move easily between processing experiments and viewing and analyzing data.
JSON Export
JSON Export: The Future of Data Management

- Seamless Integration: Convert your TRIOS data into the open standard JSON format, making it easy to integrate with programming tools, data science workflows, and lab systems (e.g. LIMS). JSON is available:
- Automatically on every save (enabled in options)
- Through manual export dialogs
- As part of the “Send to LIMS” functionality
- Via the “Batch” processing dialog or from the command line
- In TRIOS AutoPilot
- Data Consistency: Our publicly available JSON schema ensures a consistent data structure, allowing you to write code once and apply it universally across all your data files.
- Python Library: Use our open-sourced python library, TA Data Kit, to simplify your data ingestion or learn how to take advantage of the power of our data with our code examples.
For more information, click here
TRIOS Features
TRIOS Features
- Control multiple instruments with a single PC and software package
- Overlayand compare results across techniques including TMA, DMA, DSC, TGA, SDT, and rheometers
- One-Click analysis for increased productivity
- Automatedcustomreport generation including: experimental details, data plots and tables, analysis results
- Convenient data export to plain-text, PDF, CSV, XML, Excel®, Word®, PowerPoint®, and image formats
- Optional TRIOS Guardian with electronic signatures for audit trail and data integrity

Excel®, Word®, and PowerPoint® are registered trademarks of Microsoft Corporation
Touch Screen
 Touch Screen
 The Discovery TMA 450 features TA’s innovative touch screen, making operation easier than ever with enhanced One-Touch- Away™ functionality.
Touch Screen Features and Benefits:
- Ergonomic design for enhanced accessibility and productivity
- Packedwith functionality to simplify instrument operation
- Resilient, responsive touch screen for an enhanced user experience The One-Touch-Away™ interface includes:
- Start/stop controls Real-time signals and plot
- Active method viewing Temperaturesettings
- Probeand force calibrations Probe position and sample measurement settings
- System information Testand instrument status
The app-style touch screen, powerful new TRIOS software, and quick robust calibration routines work seamlessly to dramatically improve laboratory workflows and productivity.
Ease-of-Use
Ease-of-Use
TRIOS software makes calibration and operation of the TMA 450 simple. Users can easily generate multiple calibration data sets under varying experimental conditions (e.g. different heating rates or gas selections) and seamlessly switch between them to match the experimental conditions used for sample testing. Real-time signals and the progress of running experiments is readily available, with the added capability of modifying a running method on the fly. TRIOS software offers a level of flexibility that is unmatched in the industry.
Quick & Easy Calibration
Quick & Easy Calibration
TRIOS software makes calibrating the sample fixtures/probes and the TMA 450 effortless. Clear instructions, available on both the touch screen and TRIOS software, guide the operator through simple calibration steps that end with a summary report. The report provides calibration status at a glance and is stored with each data file to ensure data integrity.
Complete Data Record
Complete Data Record
The advanced data collection system automatically saves all relevant signals, active calibrations, and system settings. This comprehensive set of information is invaluable for method development, procedure deployment, and data validation.
Complete Data Analysis Capabilities
Complete Data Analysis Capabilities
A comprehensive set of relevant tools are available for real-time data analysis, even during experiments. Gain actionable insights into your material behavior through a powerful and versatile set of features seamlessly integrated into TRIOS.

All Standard TMA Analyses:
- Alpha at X1 (CTE)
- Alpha at X1 to X2 (CTE)
- Alpha fit X1 to X2 (CTE)
- Onset and endset analysis
- Dimension change (absolute and %)
- Signal maximum and minimum
- Steptransition
- Curve values at specific X or Y points
- 1st and 2nd derivatives
- Mathematical fitting: straight line, polynomial, or exponential
Advanced Analysis Capabilities on the TMA 450EM:
- Storageand loss moduli, with tan delta peak analysis when using Dynamic TMA
- Deconvolution of the Total Dimension Change signal with Modulated TMATM (MTMATM) into Reversing and Non-Reversing dimension change signals for separating expansion from contraction, shrinkage, and stress relaxation
- Seamless Integration: Convert your TRIOS data into the open standard JSON format, making it easy to integrate with programming tools, data science workflows, and lab systems (e.g. LIMS). JSON is available:
- Applications
-
Standard Operational Tests
TMA measures material deformation changes under controlled conditions of force, atmosphere, time, and temperature. Force can be applied in compression, flexure, or tensile modes of deformation using specially-designed probes. TMA measures intrinsic material properties (e.g., expansion coefficient, glass transition, Young’s modulus), plus processing/product performance parameters (e.g., softening points).
These measurements have wide applicability and can be performed by either the Discovery TMA 450 or TMA 450EM. The TMA 450 features a Standard set of tests (temperature ramp, force ramp, and isostrain), while the TMA 450EM additionally offers Stress/Strain, Creep, Stress Relaxation, Dynamic TMA, and Modulated TMA™.
Theory
Theory
Thermomechanical analysis (TMA) measures material dimensional changes under controlled conditions of force, atmosphere, time, and temperature. In the typical operation of a TMA, a small sample with parallel and flat surfaces is placed on a quartz stage near a thermocouple. A quartz probe is lowered against the specimen with a constant applied force. As the sample is heated or cooled, changes in dimension are measured by monitoring the motion of the quartz probe.
Meeting and exceeding industry standards* for testing, the Discovery TMA 450 provides information about the material’s coefficient of linear thermal expansion (CTE), shrinkage, softening, glass transition temperature, heat deflection, and much more.
Advanced tests expand the capabilities of the Discovery TMA 450 to enable scientists and engineers to get the most out of their data and their instrument investment.
The three most commonly used experiments are included on the Discovery TMA 450 as standard tests; these include the temperature ramp, force ramp and isostrain test templates.
Temperature Ramp | Monitor Displacement or Strain

Force is held constant and displacement is monitored under a linear temperature ramp to provide intrinsic property measurements.
Force Ramp | Monitor Displacement or Strain

Force is ramped and resulting strain is measured at constant temperature to generate force/displacement plots and modulus assessment.
Isostrain | Monitor Force

Strain is held constant and the force required to maintain the strain is monitored under a temperature ramp.This permits assessment of shrinkage forces in materials such as films/fibers.
Coefficient of Thermal Expansion
Coefficient of Thermal Expansion
The most common property measured on a TMA is the coefficient of thermal expansion (CTE) per international standards documented in ASTM E831, D969, D3380 and ISO 11359 Parts 1-3. The CTE describes the mechanical expansion or contraction of a material at different temperatures. It is an important property of a material, and neglecting to take into account the effect temperature has on the physical size of materials has been known to cause product failures and delamination. The mean coefficient of thermal expansion (CTE) is calculated as:

where α is the mean coefficient of thermal expansion, ∆L is the expansion of the specimen (mm) over a specified temperature range, L0 is the initial specimen length (mm), and ∆T is the temperature change (ºC) through the test. The CTE of a material is temperature dependent, and α is a reported mean for a particular temperature range.


Distortion Temperature
Distortion Temperature in 3-Point Bending
 Heat Deflection Temperature (HDT) and Deflection Temperature Under Load (DTUL) are equivalent terms that reflect the temperature at which a material subjected to a 3-point bending load deforms to a pre-determined position. The actual force applied to the sample and the amount of deflection required depend upon the sample geometry.
ASTM standard E2092, and a related standard D648, defines DTUL as the temperature at which a precise strain (either 0.25 mm deflection or 0.20% strain as defined by sample dimensions in the procedure*) occurs under a specific stress (either 455 or 1820 kPa). With the TMA, the loads (force) needed to achieve these stresses can be determined using the equation listed below.
 where F is the force (N), S is stress (0.455 MPa [66 psi] or 1.82 MPa [264 psi]), b is the sample width (mm), d is the sample thickness (mm), and L is the sample length (5.08 mm as defined by the flexure probe geometry).
The deflection of the test specimen is recorded as a function of temperature at which the predetermined level of strain is observed. The deflection or dimension change is determined using the relationship in the equation shown below.
 where D is the TMA dimension change at center span (mm) and r is Sample strain (0.0020 or 0.20%).
Deflection temperature under load (DTUL) testing is easily conducted on the Discovery 450 TMA. Polystyrene, polysulfone, and polyphenylene sulfide were tested using the three-point flexure probe with a 0.455 MPa (66psi) load, 0.2% strain, and 2°C/min heating. The DTUL measurements of these materials distinguish between their ability to bare a load at elevated temperatures and determine the temperature where rigidity is lost. The deflection temperature of a material can be modified through reformulation with compatible resins and fiber reinforcement. DTUL tests with small specimens are quick and easily conducted on the Discovery TMA 450.

Calculated values for experimental force and dimensional change at center span when using conditions of 0.455 MPa stress, 0.2% strain, and a heating rate of 2°C/min.
Sample Sample Width (b) x Thickness (d) x Length (L) (mm) Calculated Force, F (N) Dimensional Change at center span, D (μm) Polystyrene 2.33 x 1.76 x 5.08 0.431 4.89 Polysulfone 2.30 x 1.87 x 5.08 0.480 4.60 Polyphenylene sulfide 2.36 x 1.72 x 5.08 0.417 5.00
Intrinsic and Product Property Measurements
Intrinsic and Product Property Measurements

This figure shows expansion and penetration probe measurements of the Tg and the softening point of a synthetic rubber using a temperature ramp at constant applied force. The large CTE changes in the expansion plot indicate the transition temperatures. In penetration, the transitions are detected by the sharp deflection of the probe into the sample.
Penetration & Hemispherical
Penetration & Hemispherical
Softening Temperature (Ts) Determination
The penetration fixture was used to test polycarbonate/acrylonitrile-butadiene-styrene (PC/ABS), an amorphous thermoplastic blend, at a controlled heating rate of 5 °C/min and a constant force of 0.2 N. Conditions outlined in ASTM E1545 and ISO 11359 were followed in the assignment of the softening temperature/glass transition by penetration. The softening points are easily detected as a negative deflection in dimension change, and individual softening points were observed for each component of this blend.

Thermal Stress Analysis of Fibers
Thermal Stress Analysis of Fibers

This figure displays a tensile test experiment, using a temperature ramp at a constant strain (1%), to perform a stress analysis on a polyolefin fiber, as received, and after cold drawing. The plot shows the forces needed to maintain the set strain as a function of temperature. The data has been correlated with key fiber industry processing parameters, such as shrink force, draw temperature, draw ratio, elongation at break, and knot strength..
Shrinkage Force Testing
Shrinkage Force Testing

This figure illustrates a classic shrinkage force (isostrain) experiment in the tensile mode on a food wrapping film. The film was strained to 20% at room temperature for 5 minutes, cooled to -50 °C and held for more than 5 minutes, then heated at 5 °C/min to 75 °C. The plot shows the force variation (shrinkage force) required to maintain a set strain in the film. This test simulates film use from freezer to the microwave.
Advanced Operational Tests
Advanced testing capabilities include TA’s industry-leading Modulated TMATM for the most efficient separation of simultaneous expansion and contraction of a material, Dynamic TMA for viscoelastic properties by small amplitude, fixed-frequency sinusoidal deformation, and Creep/Stress Relaxation for viscoelastic behavior under transient conditions. These advanced options extend and empower scientists and engineers with even more valuable information about the mechanical behavior of materials.
Theory
Stress/Strain Tests

Stress or strain is ramped, and the resulting strain or stress is measured at a constant temperature. Using customer-entered sample geometry factors, the data provides both stress/strain plots and related modulus information. In addition, calculated modulus can be displayed as a function of stress, strain, temperature, or time.
Creep and Stress Relaxation

TMA can also measure viscoelastic properties using transient (creep or stress relaxation) tests. In a creep experiment, input stress is held constant, and resulting strain is monitored as a function of time. In a stress relaxation experiment, input strain is held constant, and stress decay is measured as a function of time. The data can also be displayed in units of compliance (creep test) and stress relaxation modulus (stress relaxation test).
Modulated TMA™ (MTMA™)

TA’s industry-leading Modulated TMATM efficiently separates simultaneous expansion and contraction in a material. Through deconvolution of the total dimensional change, an event such as the glass transition occurring in the same temperature region as stress relaxation is easily revealed. In Modulated TMATM (MTMATM), the sample experiences the combined effects of a sinusoidal temperature oscillation overlaid on the traditional linear ramp. The output signals (after Fourier transformation of the raw data) are total displacement and the change in thermal expansion coefficient.
Modulated TMA separates the total displacement into Reversing and Non-Reversing dimensional change signals. The reversing signal contains events attributable to dimension changes and is useful in detecting related events such as the Tg. The non-reversing signal contains events that relate to timedependent kinetic processes (e.g., stress relaxation). This technique is unique to the TA Instruments Discovery TMA 450EM.
Dynamic TMA Tests
In Dynamic TMA (DTMA), a sinusoidal force and linear temperature ramp are applied to the sample (Figure A), and the resulting sinusoidal strain and sine wave phase difference (δ) are measured (Figure B). From this data, storage modulus (E’), loss modulus (E”), and tan δ (E”/E’) are calculated as functions of temperature, time, or stress (Figure C). Dynamic TMA enables the scientist or engineer to obtain the viscoelastic behavior of materials.

Figure A

Figure B

Figure C

Film Tensile Testing
Film Tensile Testing

The figure above displays a strain ramp experiment at a constant temperature on a polymeric film in tension. The plot shows an extensive region where stress and strain are linearly related, and over which a tensile modulus can be directly determined. Quantitative modulus data can also be plotted as a function of stress, strain, time, or temperature. The results show the ability of the TMA 450EM to function as a mini tensile tester for films and fibers.
Tension
Fiber Stress/Strain Measurements

Stress/strain measurements are widely used to assess and compare materials. The figure shows the different regions of stress/strain behavior in a 25 μm polyamide fiber in tension, subjected to a force ramp at a constant temperature. The fiber undergoes instantaneous deformation, retardation, linear stress/strain response, and yield elongation. Other parameters (e.g., yield stress, Young’s modulus) can be determined.
Creep Analysis
Creep Analysis

Creep tests are valuable in materials selection for applications where stress changes are anticipated. This example illustrates an ambient temperature creep study on a polyethylene film in tension. It reveals the instantaneous deformation, retardation, and linear regions of strain response to the set stress, plus its recovery with time, at zero stress. The data can also be plotted as compliance, and recoverable compliance, versus time.
Stress Relaxation Analysis
Stress Relaxation Analysis

This figure shows a stress relaxation test in tension on the same polyolefin film used for the creep study in the previous example. A known strain is applied to the film and maintained while its change in stress is monitored. The plot shows a typical decay in the stress relaxation modulus. Such tests also help engineers design materials for end uses where changes in deformation can be expected.
Separating Overlapping Transitions
Separating Overlapping Transitions – Modulated TMA

The figure to the right shows an MTMA study to determine the Tg of a printed circuit board (PCB). The signals plotted are the total dimension change, plus its reversing and non-reversing components. The total signal is identical to that from standard TMA, but does not uniquely define the Tg. The component signals, however, clearly separate the actual Tg from the stress relaxation event induced by processing conditions of the PCB.
Viscoelastic Property Determination
Viscoelastic Property Determination – Dynamic TMA

This figure illustrates a dynamic test in which a semi-crystalline polyethylene terephthate (PET) film in tension is subjected to a fixed sinusoidal force during a linear temperature ramp. The resulting strain and phase data are used to calculate the material’s viscoelastic properties (e.g., E’, E”, and tan δ). The plotted data shows dramatic modulus changes as the film is heated through its glass transition temperature.
- Resources
-
 TMA 450 Brochure
- Transition Temperature of Liquid Samples by Thermomechanical Analysis
- The Correlation of TMA with ASTM Modulus Data
- A New Cyclic TMA Test Protocol for Evaluation of Electronic & Dielectric Materials
- Stress/Strain Evaluation of Fibers Using TMA
- Thermal History Determination of Textured Polyester Yarn
- Determining Minimum Usable Sample Thickness in TMA
- Calibration of TMA According to ASTM Standard Method E-831
- Determination of the Dimensional Stability of a Thin PET Film
- Simulating DTUL (ASTM D 648) Experiments with the TMA
- Characterization of Polymer Film by TMA Penetration
- Video
-


