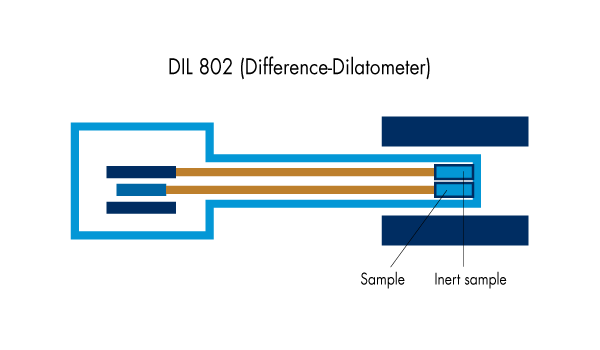
For highest measurement accuracy, the DIL 802/802L provides a truly differential measurement in a horizontal dilatometer.
For highest measurement accuracy, DIL 802 and DIL 802L provides a truly differential measurement. Measuring only the difference between the sample and the reference specimen with the same, single LVDT-sensor, the True Differential design negates the influence of measurement system expansion on the sample measurement. This measurement design is of particular benefit for dynamic temperature programs such as those employed in Rate-Controlled-Sintering (RCS) and for measurements of samples with small thermal expansion. The DIL 802 is designed for measurements under vacuum or inert gas while the DIL 802L is designed for measurements under air.
| DIL 802 | DIL 802L | |
| Sample length | 0 to 50 mm | 0 to 50 mm |
| Sample diameter: | max. 7 or 10 mm after conversion to DIL 801: 14 or 20 mm | max. 7 or 10 mm after conversion to DIL 801L: 14 or 20 mm |
| Measuring systems: | Fused silica, Al2O3 | Fused silica, Al2O3 |
| Change of length: | 4 mm | 4 mm |
| Length Resolution: | 10 nm | 20 nm |
| Temperature Resolution: | 0.05°C | 0.1°C |
| Accuracy in α: | 0.01 x 10⁻⁶ K-1 | 0.03 x 10⁻⁶ K-1 |
| Atmosphere: | vacuum, inert gas, air | air |
| Operation mode: | horizontal | horizontal |
| Temperature range: | -160°C to 1700°C according to furnace type | RT to 1700°C according to furnace type |
| Contact force: | 0.02 to 1 N, adjustable | 0.02 to 1 N, adjustable |
The horizontal furnace configuration guarantees optimal temperature uniformity and precludes air currents associated with convection. The added accuracy of the DIL 802 is due to its unique differential measurement configuration. The core of the LVDT is coupled to the sample through a conventional pushrod and moves in concert with sample expansion. The LVDT tube is coupled to an identical pushrod in contact with a specimen of well known reference material. The tube so moves in response to the thermal expansion of the system and eliminates the need to rely upon correction and calibration tests.
DIL 802 can be configured with a number of different furnaces ranging from -160 to 1700°C, while DIL 802L can fit furnaces with temperature ranges between RT to 1700°C. These furnaces can be easily exchanged and multiple furnaces can be used with a single instrument. Accurate temperature measurements are made through the selection of the appropriate thermocouple or pyrometer type for the temperature range of interest.
Inert measuring systems are available in a variety of materials. These sample tubes, bearings, and pushrods are easily interchanged to meet the needs of the measurement at hand. In order to prevent system interaction with the sample, these measuring systems are available in fused silica, Al2O3, sapphire, graphite and tungsten. Certified reference materials are also available for calibration and verification of instrument performance.
- Description
-
For highest measurement accuracy, DIL 802 and DIL 802L provides a truly differential measurement. Measuring only the difference between the sample and the reference specimen with the same, single LVDT-sensor, the True Differential design negates the influence of measurement system expansion on the sample measurement. This measurement design is of particular benefit for dynamic temperature programs such as those employed in Rate-Controlled-Sintering (RCS) and for measurements of samples with small thermal expansion. The DIL 802 is designed for measurements under vacuum or inert gas while the DIL 802L is designed for measurements under air.
- Specifications
-
DIL 802 DIL 802L Sample length 0 to 50 mm 0 to 50 mm Sample diameter: max. 7 or 10 mm after conversion to DIL 801: 14 or 20 mm max. 7 or 10 mm after conversion to DIL 801L: 14 or 20 mm Measuring systems: Fused silica, Al2O3 Fused silica, Al2O3 Change of length: 4 mm 4 mm Length Resolution: 10 nm 20 nm Temperature Resolution: 0.05°C 0.1°C Accuracy in α: 0.01 x 10⁻⁶ K-1 0.03 x 10⁻⁶ K-1 Atmosphere: vacuum, inert gas, air air Operation mode: horizontal horizontal Temperature range: -160°C to 1700°C according to furnace type RT to 1700°C according to furnace type Contact force: 0.02 to 1 N, adjustable 0.02 to 1 N, adjustable - Measurement Principle
-
The horizontal furnace configuration guarantees optimal temperature uniformity and precludes air currents associated with convection. The added accuracy of the DIL 802 is due to its unique differential measurement configuration. The core of the LVDT is coupled to the sample through a conventional pushrod and moves in concert with sample expansion. The LVDT tube is coupled to an identical pushrod in contact with a specimen of well known reference material. The tube so moves in response to the thermal expansion of the system and eliminates the need to rely upon correction and calibration tests.
- Temperature Range
-
DIL 802 can be configured with a number of different furnaces ranging from -160 to 1700°C, while DIL 802L can fit furnaces with temperature ranges between RT to 1700°C. These furnaces can be easily exchanged and multiple furnaces can be used with a single instrument. Accurate temperature measurements are made through the selection of the appropriate thermocouple or pyrometer type for the temperature range of interest.
- Measuring System
-
Inert measuring systems are available in a variety of materials. These sample tubes, bearings, and pushrods are easily interchanged to meet the needs of the measurement at hand. In order to prevent system interaction with the sample, these measuring systems are available in fused silica, Al2O3, sapphire, graphite and tungsten. Certified reference materials are also available for calibration and verification of instrument performance.


