Two-samples simultaneous operation to maximize productivity without comprises on results.
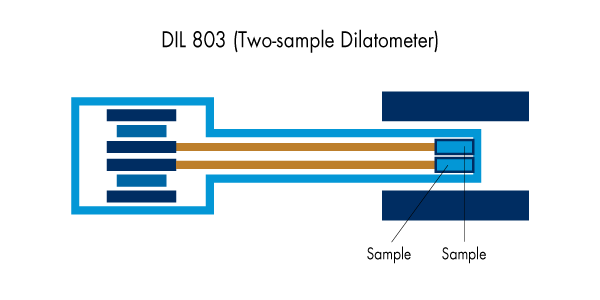
To maximize sample throughput, DIL 803 and DIL 803L offers two-samples simultaneous operation. DIL803 and DIL 803L can also be operated with an inert reference sample for quasi-differential measurement, reducing the influence of measurement system expansion and increasing measurement accuracy under dynamic temperature conditions. The DIL 803 is designed for measurements under vacuum or inert gas while the DIL 803L is designed for measurements under air, making the DIL 803L ideally suited to measuring ceramic materials.
| DIL 803 | DIL 803L | |
| Sample length | 0 to 50 mm | 0 to 50 mm |
| Sample diameter: | Max. 7 or 10 mm | Max. 7 or 10 mm |
| Measuring systems: | Fused silica, Al2O3 | Fused silica, Al2O3 |
| Change of length: | 4 mm | 4 mm |
| Length Resolution: | 10 nm | 20 nm |
| Temperature Resolution: | 0.05°C | 0.1°C |
| Accuracy in α: | 0.03 x 10⁻⁶ K-1 | 0.05 x 10⁻⁶ K-1 |
| Atmosphere: | Vacuum, inert gas, air | Air |
| Operation mode: | Horizontal | Horizontal |
| Temperature range: | -160°C to 1700°C according to furnace type |
RT to 1700°C according to furnace type
|
| Contact force: | 0.02 to 1 N, adjustable | 0.02 to 1 N, adjustable |
The horizontal furnace configuration guarantees optimal temperature uniformity and precludes air currents associated with convection. High sensitivity displacement measurements are made using a high resolution LVDT, guaranteeing that even the smallest thermal expansion events are measured accurately. The measuring head of the DIL803/803L is thermally stabilized and insensitive to shocks.
The DIL 803/803L increases sample throughput by enabling the measurement of two samples simultaneously. Alternatively, the DIL 803 may operate as a quasi-differential dilatometer, in which to improve measurement accuracy one of the sample positions is used for an inert reference material as a system expansion correction.
Measurement Example

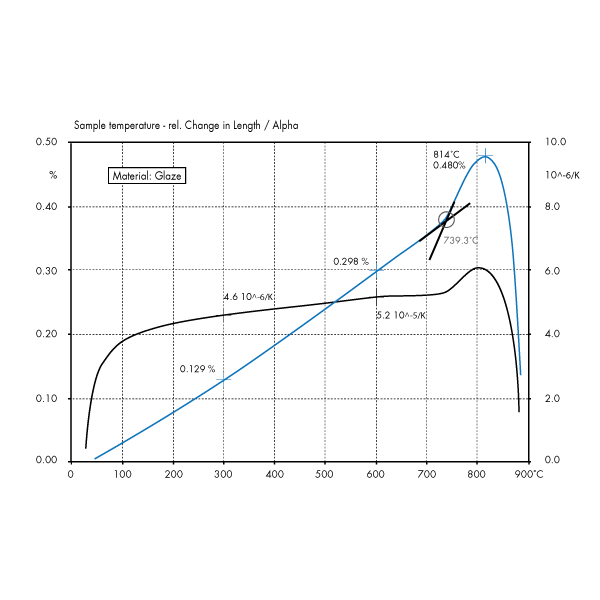
An example of the two samples measurement benefit is shown in the above data. This example,shows the thermal expansion of the glaze on a ceramic body. This glaze is a thin film and so must be measured while applied to the ceramic body. In order to remove the influence of the ceramic substrate from the measurement, the unglazed ceramic was measured at the same time as the glazed part. The thermal expansion due to the unglazed ceramic was subtracted from the total measurement, leaving a quantitative measurement of the glaze dimension change.
DIL 803 and DIL 803L can be configured with a number of different furnaces ranging from -160 to 1700°C. These furnaces can be easily exchanged and multiple furnaces can be used with a single instrument. Accurate temperature measurements are made through the selection of the appropriate thermocouple or pyrometer type for the temperature range of interest.
Inert measuring systems are available in a variety of materials. These sample tubes, bearings, and pushrods are easily interchanged to meet the needs of the measurement at hand. In order to prevent system interaction with the sample, these measuring systems are available in fused silica, Al2O3, sapphire, graphite and tungsten. Certified reference materials are also available for calibration and verification of instrument performance.
- Description
-
To maximize sample throughput, DIL 803 and DIL 803L offers two-samples simultaneous operation. DIL803 and DIL 803L can also be operated with an inert reference sample for quasi-differential measurement, reducing the influence of measurement system expansion and increasing measurement accuracy under dynamic temperature conditions. The DIL 803 is designed for measurements under vacuum or inert gas while the DIL 803L is designed for measurements under air, making the DIL 803L ideally suited to measuring ceramic materials.
- Specifications
-
DIL 803 DIL 803L Sample length 0 to 50 mm 0 to 50 mm Sample diameter: Max. 7 or 10 mm Max. 7 or 10 mm Measuring systems: Fused silica, Al2O3 Fused silica, Al2O3 Change of length: 4 mm 4 mm Length Resolution: 10 nm 20 nm Temperature Resolution: 0.05°C 0.1°C Accuracy in α: 0.03 x 10⁻⁶ K-1 0.05 x 10⁻⁶ K-1 Atmosphere: Vacuum, inert gas, air Air Operation mode: Horizontal Horizontal Temperature range: -160°C to 1700°C according to furnace type RT to 1700°C according to furnace typeContact force: 0.02 to 1 N, adjustable 0.02 to 1 N, adjustable - Measurement Principle
-
The horizontal furnace configuration guarantees optimal temperature uniformity and precludes air currents associated with convection. High sensitivity displacement measurements are made using a high resolution LVDT, guaranteeing that even the smallest thermal expansion events are measured accurately. The measuring head of the DIL803/803L is thermally stabilized and insensitive to shocks.
The DIL 803/803L increases sample throughput by enabling the measurement of two samples simultaneously. Alternatively, the DIL 803 may operate as a quasi-differential dilatometer, in which to improve measurement accuracy one of the sample positions is used for an inert reference material as a system expansion correction.
Measurement Example

An example of the two samples measurement benefit is shown in the above data. This example,shows the thermal expansion of the glaze on a ceramic body. This glaze is a thin film and so must be measured while applied to the ceramic body. In order to remove the influence of the ceramic substrate from the measurement, the unglazed ceramic was measured at the same time as the glazed part. The thermal expansion due to the unglazed ceramic was subtracted from the total measurement, leaving a quantitative measurement of the glaze dimension change.
- Temperature Range
-
DIL 803 and DIL 803L can be configured with a number of different furnaces ranging from -160 to 1700°C. These furnaces can be easily exchanged and multiple furnaces can be used with a single instrument. Accurate temperature measurements are made through the selection of the appropriate thermocouple or pyrometer type for the temperature range of interest.
- Measuring System
-
Inert measuring systems are available in a variety of materials. These sample tubes, bearings, and pushrods are easily interchanged to meet the needs of the measurement at hand. In order to prevent system interaction with the sample, these measuring systems are available in fused silica, Al2O3, sapphire, graphite and tungsten. Certified reference materials are also available for calibration and verification of instrument performance.


